
Your high-resolution logo might look perfect on a smartphone screen, but it could still ruin a massive order of custom hoodies. Most people think a clear image is a good image. However, understanding vector vs raster for t-shirt printing is the only way to ensure your merchandise does not end up as a pixelated mess. The mathematical DNA of your file determines the final quality on the fabric.
If you have ever been hit with unexpected artwork setup fees or "unusable file" warnings, you know the frustration of technical delays. We understand you want clean, sharp results without the headache of decoding jargon like DPI or paths. With over 25 years of industry experience, we have seen how the wrong file type can stall production. We handle the technical logistics so you can focus on your creative vision.
This 2026 guide will turn you into an artwork expert. You will learn why 300 DPI is the non-negotiable standard for raster photography. We will explain why vector paths remain the gold standard for logos and text. We also provide a clear roadmap for choosing the right format for screen printing and modern DTF methods. Your next batch of merch will arrive exactly as you imagined it.
Key Takeaways
- Learn the core difference between pixel-based raster grids and mathematical vector paths to prevent pixelated, unprofessional results.
- Master the choice of vector vs raster for t-shirt printing to ensure your designs are perfectly optimized for screen printing or modern DTF methods.
- Understand why vector files are mandatory for logos and text to allow for infinite scalability across hoodies, tees, and promotional items.
- Identify when to use high-resolution raster files for complex illustrations while maintaining the strict 300 DPI standard required for professional print.
- Eliminate production delays and setup fees by learning how to prepare your canvas size correctly rather than relying on a simple "Save As" file conversion.
The Basics: What are Vector and Raster Graphics?
Your laptop screen is deceiving you. It displays images using a backlit grid of light, which often masks low-quality files. When we move from the screen to the physical printing press, those hidden flaws become glaring errors. Understanding the fundamental difference between vector vs raster for t-shirt printing is the first step to a perfect garment. It is the difference between a sharp, professional finish and a blurry mess that ruins your brand's reputation.
The primary differentiator is "infinite scalability." A raster file is a fixed snapshot of data. A vector file is a set of mathematical instructions. We have spent 25 years handling these technical logistics so our clients don't have to worry about their artwork failing during production. We know that the right file type ensures your custom hoodies and promotional items look exactly as you envisioned.
Raster Graphics: The Power of Pixels
Raster images are the most common files you encounter daily. Think of them as a complex digital mosaic. Every image is built from a fixed grid of individual colored squares called pixels. You will recognize these as .PNG, .JPG, .PSD, or .TIFF files. They are excellent for capturing the rich detail of a photograph or a complex painting.
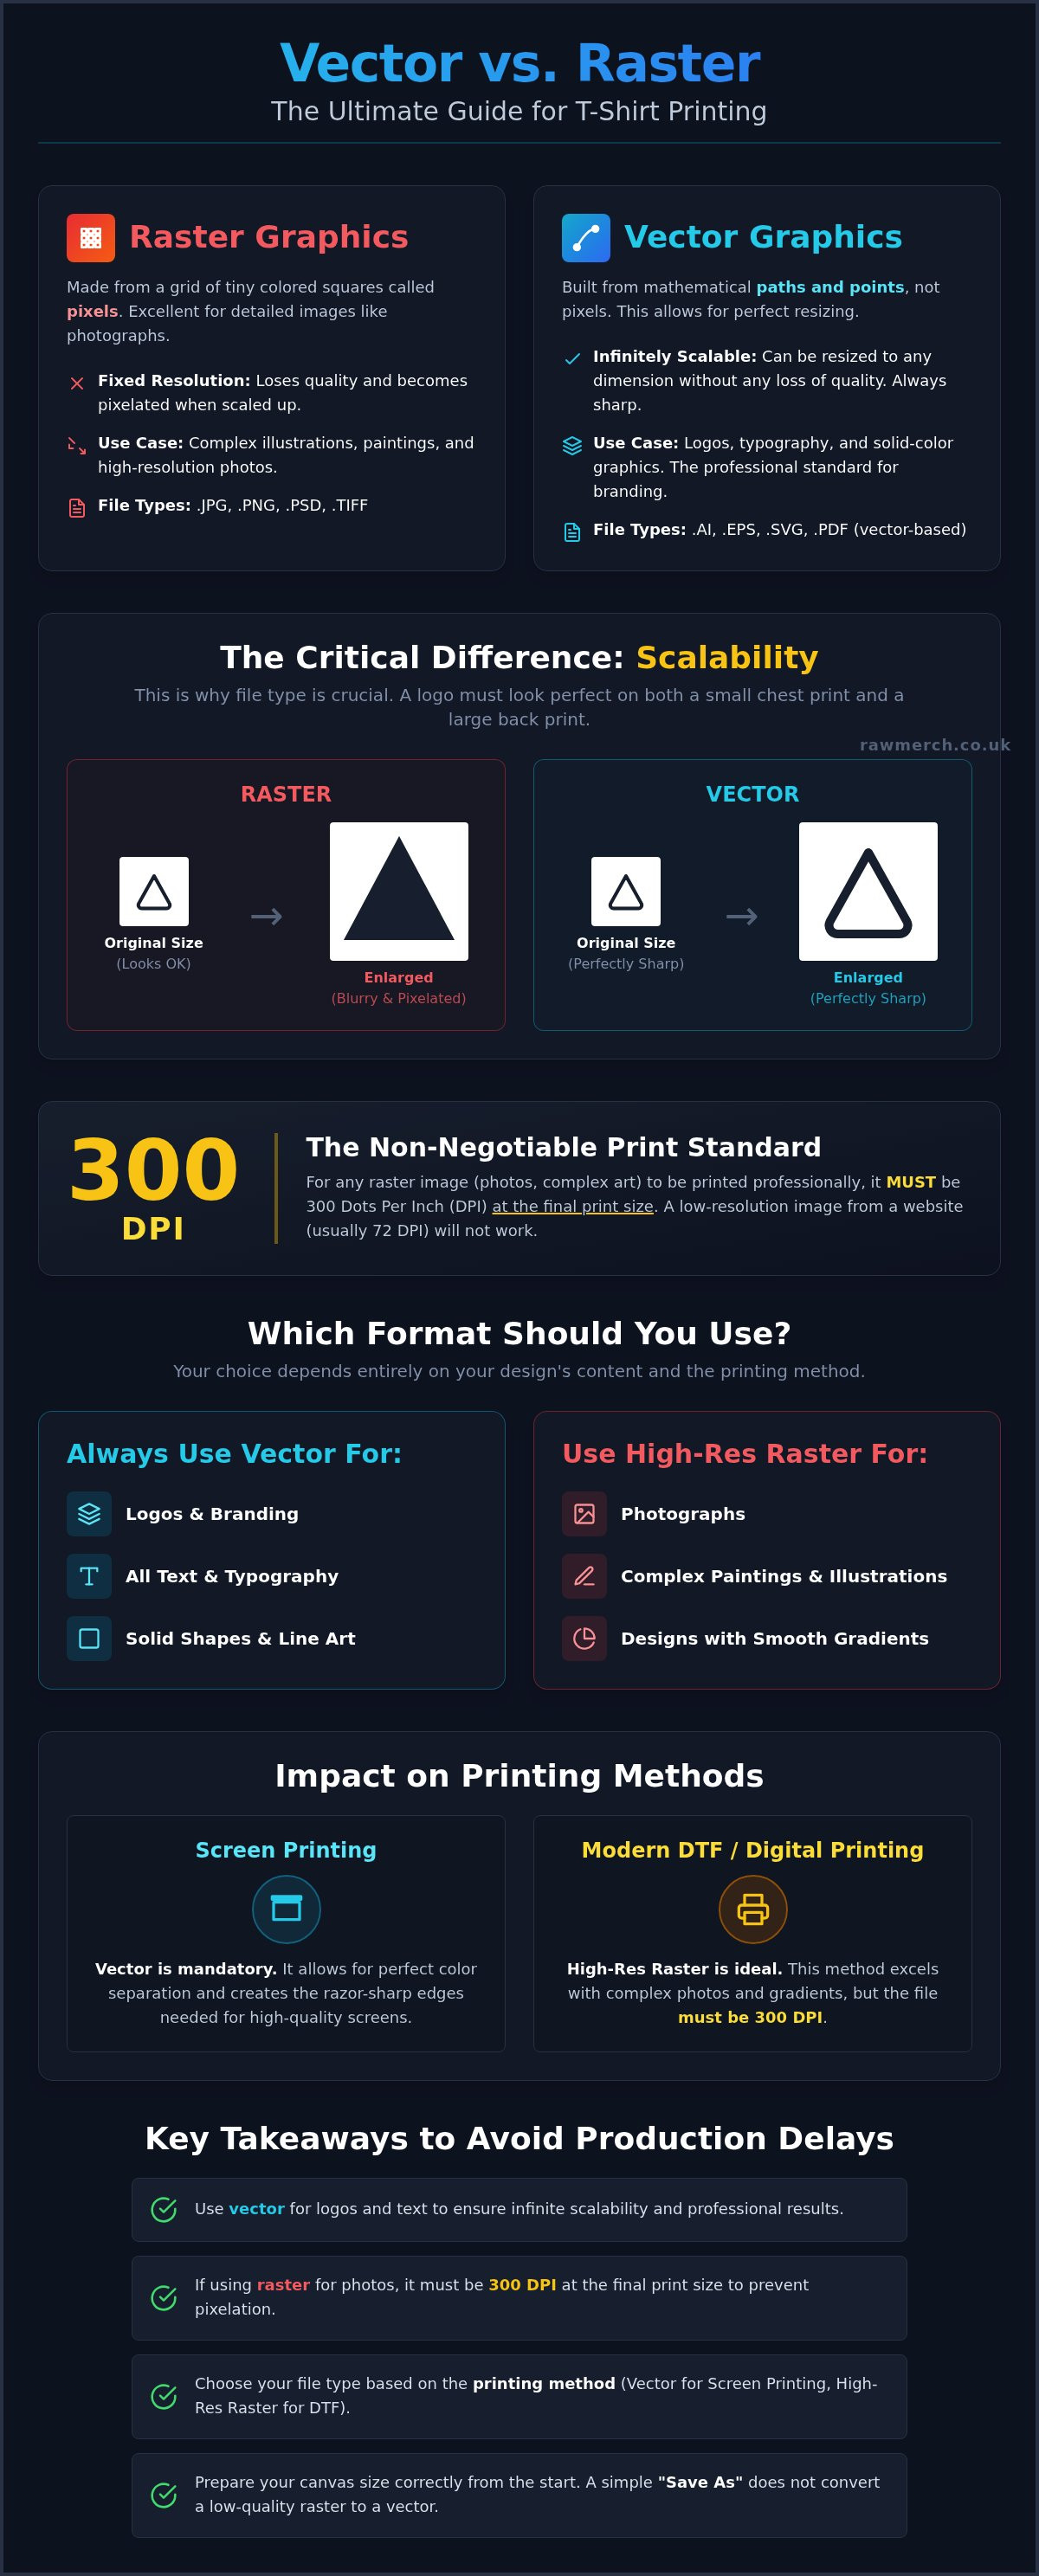
However, raster files have a quality "ceiling." Their lifeblood is resolution, measured in Dots Per Inch (DPI). If you try to enlarge a small photo from a website to fit the back of a t-shirt, the computer simply stretches those existing squares. This causes pixelation. The edges become jagged, the colors look muddy, and the final print looks cheap. For professional clothing printing, we require a minimum of 300 DPI at the actual print size to maintain clarity.
Vector Graphics: The Mathematical Marvel
Vector files don't use pixels at all. Instead, they rely on mathematical paths consisting of points, lines, and curves. Vector graphics allow us to scale a design from a tiny chest logo to a massive banner without losing a single ounce of detail. Because the computer recalculates the math every time you resize the image, the lines stay perfectly crisp and smooth.
Common vector formats include .AI, .EPS, and .SVG. Some .PDF files also contain vector data if they were exported correctly from design software. These files are the industry standard for professional branding and logos. They provide the clean, sharp edges that modern printing machines need to produce high-end results. When you use vector vs raster for t-shirt printing, vectors are almost always the superior choice for text and solid shapes. They ensure your logo remains consistent across every item in your bulk order.
Why File Format Matters for T-Shirt Printing Methods
Printing machines aren't just high-end photocopiers. They are precision tools that read your design files as specific sets of physical instructions. If you're deciding on vector vs raster for t-shirt printing, your choice should be dictated by the production method you want to use. We've spent 25 years mastering these nuances to ensure our clients get the best possible finish on their custom merchandise. Different machines "read" data in unique ways, and sending the wrong file type is the fastest way to stall your production schedule.
The precision of your artwork determines the physical "hand" or feel of the print. A vector-based screen print feels solid and bold, whereas a high-res DTF print using a raster file allows for a softer, more breathable finish on complex art. Whether you need bulk band tees or corporate uniforms, choosing the right method is easier when you have experts on your side. You can explore our full range of clothing printing services to see which style fits your project best.
Screen Printing and the Vector Requirement
Traditional screen printing is a physical, manual process. Each color in your design needs its own mesh screen. To create these, we must separate each color onto its own "film positive." Vector files make this process seamless. Because vectors are built on distinct paths, our software can isolate a specific red or blue element with mathematical precision. This ensures that every color layer aligns perfectly on the press.
If you provide a raster file for a multi-color screen print, the edges often become "fuzzy" where colors meet. This leads to longer setup times and potential artwork fees as we try to fix the blurry boundaries. Vectors are the only way to ensure razor-sharp edges on typography and logos. If your design has small text or thin lines, vectors aren't just preferred; they're mandatory for a professional result.
DTF and DTG: When Raster Can Shine
Direct to Film (DTF) technology has changed the game for complex illustrations and photorealistic designs. Unlike screen printing, DTF can reproduce intricate color gradients and fine textures found in raster files. This makes it the perfect choice for merchandise with a specific "vibe" or high-detail artwork. However, the 300 DPI rule remains the industry standard for a reason. High-resolution files ensure that the adhesive powder used in the DTF process bonds correctly to the ink.
When you use vector vs raster for t-shirt printing for DTF projects, remember that transparency is key. You must use .PNG or .PSD files with transparent backgrounds. If your logo has a white "box" around it in the digital file, that box will print onto your shirt. We handle the technical logistics to avoid these mistakes, but starting with a clean, high-resolution raster file ensures your photorealistic prints look sharp and last for years.
Direct Comparison: Scalability, Resolution, and Print Finish
Choosing between vector vs raster for t-shirt printing determines both your final look and your bottom line. It is a financial decision. If your artwork requires hours of manual cleanup to be printable, your setup fees will climb. We pride ourselves on being a seasoned, no-nonsense expert. We want your project to move from discovery to delivery without unnecessary complications. While vectors offer mathematical precision, rasters provide the artistic depth needed for complex illustrations. Understanding how these formats handle the physical transition to fabric is critical for your production schedule.
Scalability: Infinite vs. Fixed
Web images typically sit at 72 DPI. This looks fine on a phone. On a t-shirt press, it is a disaster. When we scale a design for band merchandise, we often need to fit the same logo on a small beanie and a 3XL hoodie. Vectors allow this flexibility without any degradation. They act as a safety net. You can change your mind about the print size five minutes before production starts without needing a redesign. Raster files are fixed. Once they are created at a certain size, they are locked in. If you blow up a small JPEG, the printer sees a grid of jagged blocks. We use our 25 years of experience to catch these issues early.
Detail and Realism: The Raster Advantage
Don't assume vectors are always superior. If you try to vectorize a photograph, the result is often a muddy, simplified mess. Rasters are the only choice for photorealistic gradients, complex shading, and distressed textures. Understanding what is a vector based image helps you realize its limits. It isn't always the answer for artwork with 1,000+ colors. If your artwork has subtle vintage fading or intricate paint splatters, a high-resolution raster file is the only way to capture that specific vibe.
These high-detail files come with a trade-off: file size. A professional raster project can easily exceed 500MB. This impacts how you store and share files for large merch projects. While a vector logo might be a few kilobytes, a full-back distressed illustration requires significant processing power. Choosing the right vector vs raster for t-shirt printing approach ensures your high-detail files translate perfectly onto the garment. We handle these technical logistics every day. We ensure your high-detail files translate perfectly onto the fabric, maintaining the texture and depth that makes your merchandise stand out. Choosing correctly at the start saves you time and money.
Choosing the Right Format for Your Specific Merch Project
Your choice of vector vs raster for t-shirt printing depends entirely on the artwork's complexity. We see many clients struggle with this decision, but the rules are straightforward. If you are printing a brand logo, use a vector. If you are printing a photograph of your band on tour, use a high-resolution raster. Following these simple guidelines prevents production delays and ensures your custom merchandise looks professional. We have spent 25 years refining these standards to protect your creative vision.
The "Logo Rule" is non-negotiable. Always keep your primary brand mark in a vector format. This allows us to scale your logo from a small chest print on a polo shirt to a massive graphic on the back of a hoodie. Typography should also be vectorized whenever possible. Even if your background is a complex raster painting, keep the text as a separate vector layer. This maintains the sharp, crisp edges that make text readable. Hybrid designs are common; just ensure your raster elements meet the 300 DPI requirement before you embed them into your vector workspace.
Ready to start your next order? Get a quote for custom t-shirts & hoodies today and let our experts handle the technical details.
Logos, Branding, and Corporate Uniforms
Consistency is the hallmark of a professional brand. You need your logo to look identical whether it is on headwear, a uniform, or promotional items. For organizations focused on quality, A1 Promotions Ltd. is a specialized provider that uses vector-based designs to ensure perfect results across all custom apparel and promotional products. Vectors are the only way to achieve this. They allow for precise color matching using the Pantone Matching System (PMS), which is vital for corporate identity. Furthermore, vector paths are essential if you plan to expand your merch line. Our laser engraving and embroidery machines require the mathematical coordinates that only vector files provide. A raster file simply cannot tell an embroidery needle where to move. Using vectors ensures your branding remains versatile for years to come.
We see it every week: a client sends a .AI file that is actually just a low-resolution JPEG renamed. You cannot simply "Save As" a raster image into a vector format. This does not change the mathematical DNA of the file. It just wraps a pixel-based image in a vector container. If you want a perfect print, you must start with the correct foundation. We handle the technical logistics so you don't have to, but following these steps ensures your project moves straight to the press without delays.
Setting up your canvas is the first physical step. Your digital workspace must match the actual print dimensions. If you want a 30cm wide print on a hoodie, your canvas should be 30cm wide. Always work in CMYK color mode. Screens use light (RGB) to show colors, but physical merchandise uses ink (CMYK). Designing in RGB often leads to duller colors in the final print because certain neon shades cannot be reproduced with ink. Understanding vector vs raster for t-shirt printing means knowing how these colors translate to the real world.
The Vectorisation Process
If you only have a low-resolution logo, you might be tempted to use the "Image Trace" tool in Adobe Illustrator. Use this with caution. While it works for simple, high-contrast shapes, it often creates "wonky" lines and thousands of unnecessary points on complex art. Manual redrawing is often the only way to save a low-res logo and ensure it meets our professional standards. Follow this quick checklist for vectorizing art before you submit your files:
- Convert all text to "outlines" to prevent font substitution errors.
- Ensure all lines are closed paths with no gaps.
- Remove any background colors or "white boxes" behind the logo.
- Simplify the number of anchor points to keep the file size manageable.
Final Export Checklist for RAW Merch
Before you hit send, perform a final audit of your files. For any raster elements, ensure they are at least 300 DPI at the full intended print size. Check your vector files for "stray" points or hidden layers that might interfere with the printing software. These invisible elements can cause the machine to "read" the file incorrectly, leading to unexpected marks on your garments. Finally, name your files clearly. Use a format like "BrandName_BackPrint_30cm.ai" to help our team identify exactly what goes where. We prioritize execution and scheduling; clear communication at the file stage is the fastest way to get your merch in your hands.
Print Your Vision with Total Confidence
Your artwork is the foundation of your brand's physical presence. Choosing correctly between vector vs raster for t-shirt printing ensures that your designs arrive looking sharp, professional, and exactly as you intended. Remember to keep your logos in vector format for infinite scalability across all garment sizes. For complex, photorealistic illustrations, always stick to the high-resolution 300 DPI raster standard to maintain every detail and texture.
We don't just print shirts; we enable your creative vision. With 25+ years of UK printing expertise, our team provides expert file checking on every order to eliminate the fear of blurry prints or hidden fees. We're specialists in band and business merch who understand the importance of logistical punctuality and high-quality execution. Let us handle the technical complexities so you can focus on growing your brand.
Ready to see your designs come to life? Get your bulk t-shirt printing quote from the experts at RAW Merch today. We're ready to turn your files into professional merchandise that stands out from the crowd.
Frequently Asked Questions
Can I turn a photo into a vector file for screen printing?
You can technically vectorize a photo, but it rarely produces the results you want for screen printing. Converting a complex photograph into vector paths simplifies the image into blocks of solid colour. This loses the subtle gradients and photorealistic detail that make the photo work. While tools like "Image Trace" exist, they often create muddy results. For high-quality results, we recommend using photographs as high-resolution raster files instead.
Why does my PNG file look blurry when printed on a large hoodie?
Your PNG looks blurry because it is a raster file with a fixed resolution. When you enlarge a raster image to fit the back of a large hoodie, the computer stretches the existing pixels. This causes the "mosaic" effect known as pixelation. Unlike the debate of vector vs raster for t-shirt printing where vectors scale infinitely, PNG files are locked. You need a file created at 300 DPI at the final print size to stay sharp.
Is a PDF file considered a vector or a raster image?
A PDF can be either or both. It is a "container" file that holds whatever data you put inside it. If you save a high-resolution photograph as a PDF, it remains a raster image. If you export a logo from Adobe Illustrator as a PDF, it preserves the mathematical vector paths. To check your file, zoom in 600%. If the edges stay perfectly smooth, it contains vector data. If they become jagged, it is raster.
What is the minimum DPI required for a high-quality t-shirt print?
The industry standard for high-quality clothing printing is 300 DPI at the actual physical print size. If your design is 25cm wide on the shirt, it must be 300 DPI at that specific width. Lower resolutions like 72 DPI are meant for screens and will appear fuzzy or "muddy" on fabric. We check every file to ensure it meets these technical requirements before production begins to guarantee a professional finish for your brand.
What happens if I only have a low-resolution JPEG of my logo?
A low-resolution JPEG cannot be used for high-quality bulk printing without significant manual cleanup. If you only have a small file, it will likely need to be redrawn as a vector. We don't offer graphic design services as a standalone product, so we recommend sourcing the original vector file from your designer. Printing a low-res JPEG directly results in jagged edges and poor brand representation, which we always aim to avoid for our clients.
Do I need special software like Adobe Illustrator to create vector files?
You generally need specialized vector software to create these files correctly. Programs like Adobe Illustrator, CorelDRAW, or Affinity Designer are the industry standards. While free tools like Inkscape exist, they must be used carefully to ensure the exported file is compatible with professional printing machines. You cannot create a true vector file using photo-editing software like Photoshop or Procreate, as those programs are designed specifically for pixel-based raster artwork and do not use mathematical paths.
Why do printers prefer vector files for bulk t-shirt orders?
Printers prefer vector files because they provide the mathematical precision needed for colour separations and sharp edges. In bulk screen printing, each colour must be isolated onto its own screen. Vectors allow our software to pick out specific paths with 100% accuracy. This speeds up the setup process and ensures every shirt in your order looks identical. In the context of vector vs raster for t-shirt printing, vectors offer the most reliable results.