
Your creative vision is only as good as the digital file you send to the press. It's a hard truth that a stunning design on your screen can easily turn into a pixelated disaster on 100 expensive garments if you don't follow the correct artwork requirements for t-shirt printing. We know the frustration of getting stuck in an endless loop of emails with printers asking for better files while your deadline looms. You want your merch to look professional. You want it delivered without the technical headaches.
It's stressful to invest your budget into bulk merchandise when technical jargon like DPI, Vector, and CMYK feels like a foreign language. We agree that you shouldn't have to be a master graphic designer just to get a clean print. This guide provides the technical blueprint you need to turn your ideas into flawless, retail-quality merchandise with total confidence. We'll break down the essential checklist for 2026, including resolution standards, file formats, and the specific RAW Merch Protocol used by industry experts to ensure your final product matches your screen every single time.
Key Takeaways
- Learn why vector files are the industry gold standard and how to correctly prepare raster images at 300 DPI for maximum clarity.
- Master the essential artwork requirements for t-shirt printing to avoid common pitfalls like pixelation, blurry lines, and wasted stock.
- Discover the RAW Merch Protocol for outlining fonts and embedding images to ensure your files are print-ready the moment they hit our desk.
- Understand the technical difference between RGB and CMYK color modes to guarantee your final product matches your creative vision.
- Gain expert insights into sizing, safe zones, and garment placement to achieve a professional, retail-quality finish every time.
Vector vs. Raster: The Core Artwork Requirements for T-Shirt Printing
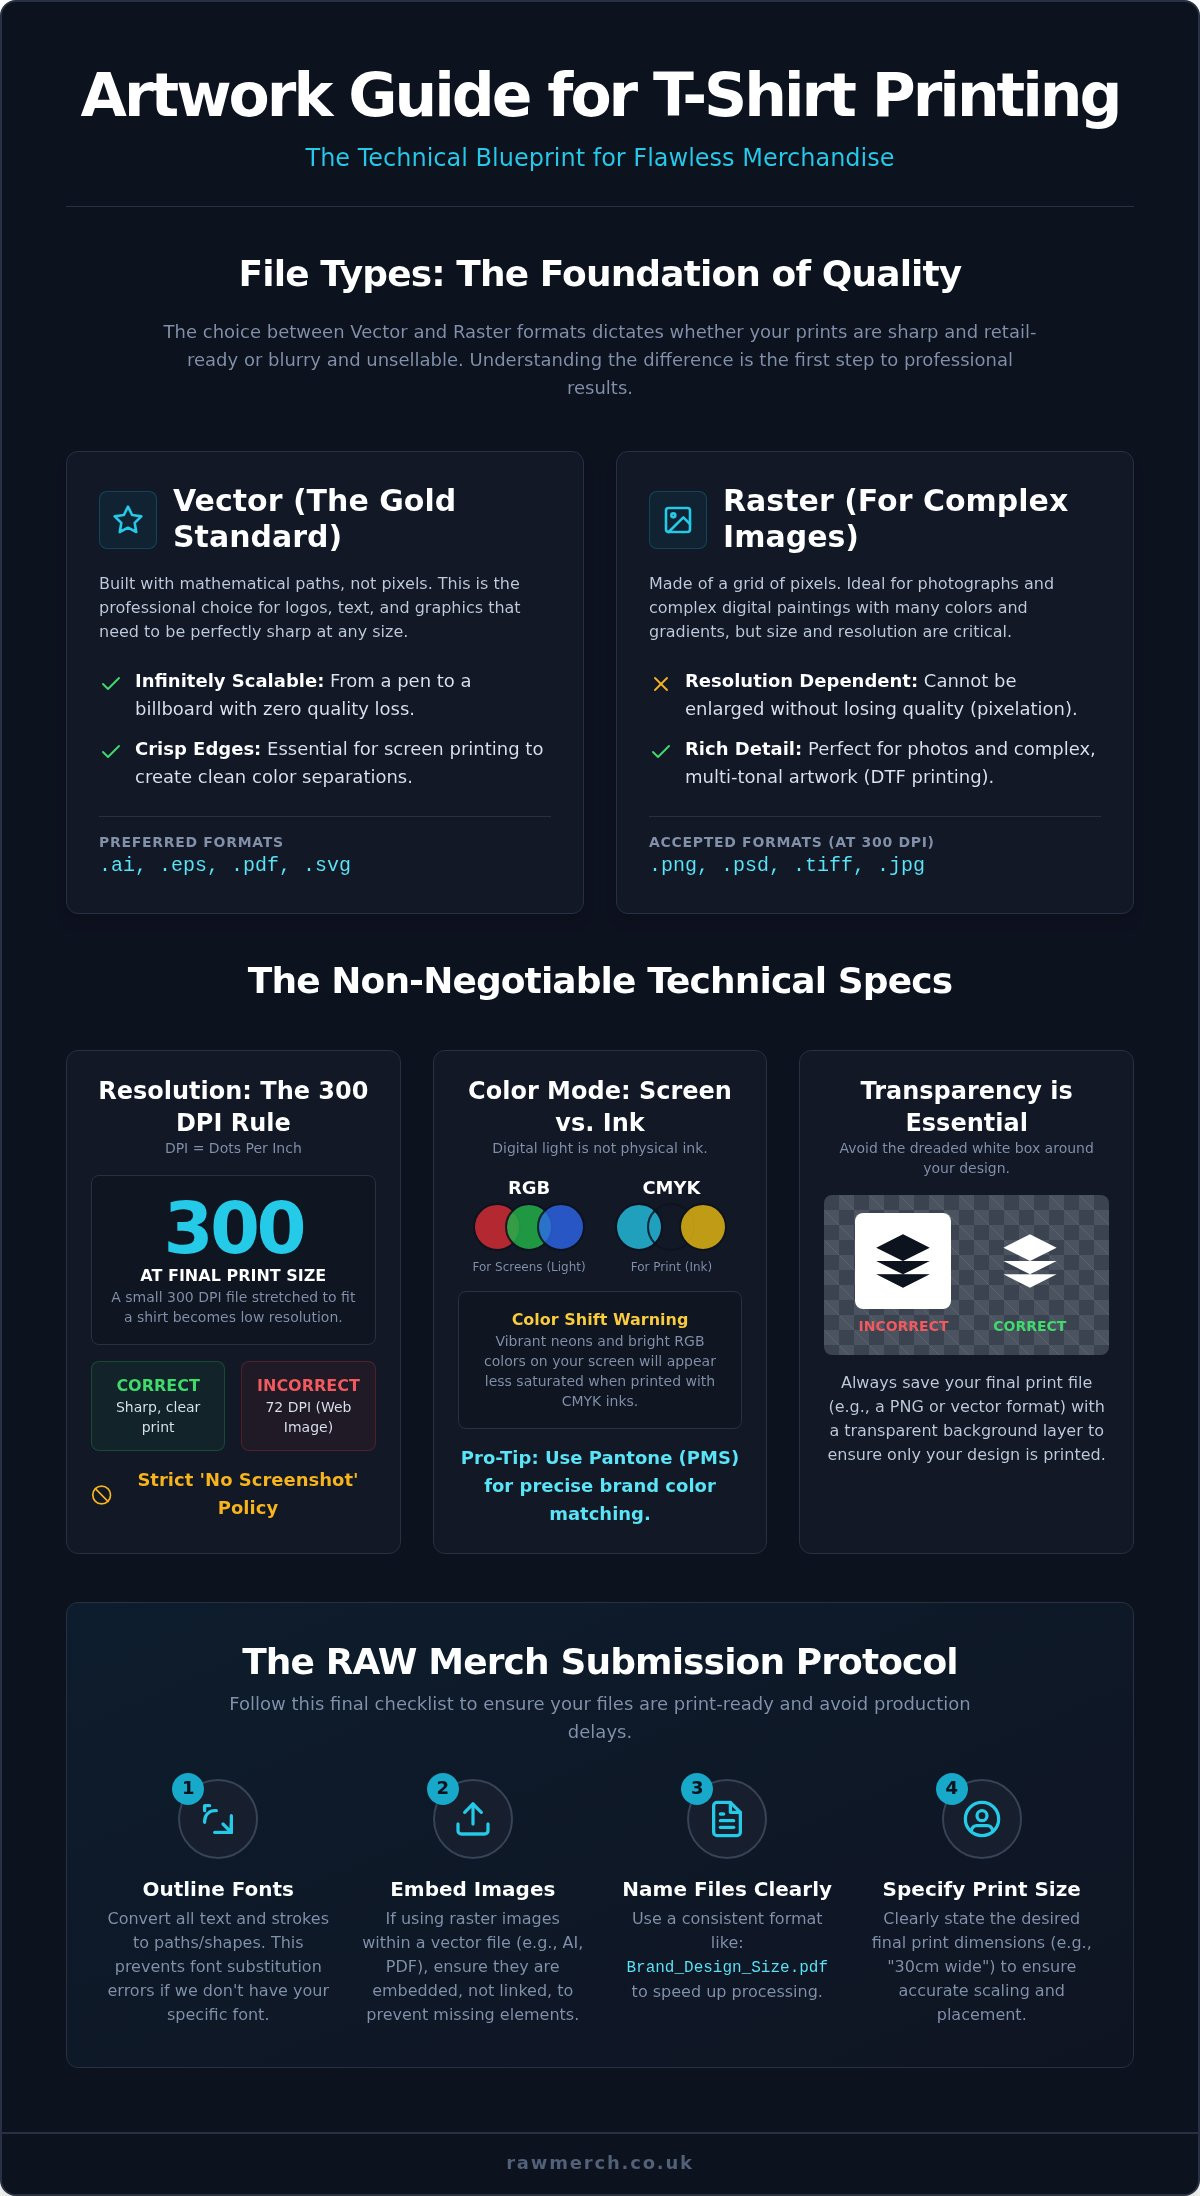
The foundation of professional merch starts with understanding file types. If you send the wrong format, your brand looks amateur. To meet the standard artwork requirements for t-shirt printing, you must choose between vector and raster based on your design's complexity. This choice dictates whether your prints are sharp and retail-ready or blurry and unsellable. We prioritise quality, and that begins with the data you provide.
What is a Vector Based Image and Why Does it Matter?
Vector files are the gold standard for branding. They don't use pixels. Instead, they use mathematical paths to define shapes and lines. This means you can scale a logo from a business card to a billboard without losing a single drop of sharpness. If you want to know more, read our guide on what is a vector based image? to see why it's a game changer for your brand.
For the screen printing process, vectors are non-negotiable for logos and text. They allow us to separate colors perfectly for the film positives used to create screens. Clean paths ensure that ink goes exactly where it's supposed to go. Without vectors, sharp-edged graphics often end up with 'staircase' edges that look cheap. We prefer vector files like AI, EPS, and PDF because they guarantee the cleanest possible finish on cotton.
When Raster Files are Acceptable
Raster files have their place in 2026. If your design is a photograph or a complex digital painting with thousands of gradients, you need pixels. However, the 300 DPI rule is absolute. We have a strict 'No Screenshot' policy. A web image at 72 DPI might look fine on your phone; it will look like a blurry mess once it's enlarged on a t-shirt. Low-resolution files are the primary cause of production delays.
Always provide raster files like PNG, JPEG, or PSD at the actual print size. If your design is 30cm wide, the file must be 30cm wide at 300 DPI. To check your quality, zoom in to 300% on your screen. If you see blur or blocks, we'll see them too. While raster works for DTF (Direct to Film) printing, it's rarely the right choice for logos. Stick to the golden rule: vector for graphics, raster for photos. Following these artwork requirements for t-shirt printing ensures your order moves straight to production without delays. We don't provide graphic design services, so getting this right first time saves you money and stress.
Technical Specs: Resolution, Colour, and Transparency
Technical specs aren't suggestions; they are the rules of the press. If you ignore them, your merch quality suffers. Mastering the artwork requirements for t-shirt printing means looking beyond the screen. Your monitor uses light (RGB), but we use ink (CMYK). This fundamental difference is where most amateur errors occur. We've spent 25 years seeing designs fail because the technical blueprint was flawed. Don't let your creative vision get lost in translation.
Transparency is a non-negotiable requirement. If you submit a logo with a white background for a black garment, you will end up with a solid white rectangle around your art. This is a common mistake that ruins retail-quality merch. Professional files must have a transparent background layer to ensure the design sits naturally on the fabric texture. Additionally, file naming matters for efficiency. Avoid generic names like 'logo.pdf' or 'final_v2'. Use a clear format: BrandName_DesignTitle_PrintSize. This simple step speeds up our UK-based production team and prevents logistical errors.
Mastering the CMYK Shift
Digital screens lie. They show neon greens and electric blues that physical ink simply cannot replicate. CMYK is the four-colour process used in physical printing to ensure colour accuracy. If your design relies on vibrant neons, be prepared for a shift. Physical ink cannot match the glow of a backlit monitor. For total consistency, especially with corporate logos, use Pantone (PMS) references. This is how pros ensure their brand identity remains identical across every garment. If you're unsure if your file is ready, checking the Vector vs. Raster definitions can help you determine the best path for your specific design.
Resolution and the 300 DPI Trap
The 300 DPI standard is only half the story. That resolution must exist at the final print size. For example, a center-chest design should be roughly 25cm to 30cm wide. If you stretch a small file to fit that space, you'll get 'muddy' results. Upsampling in software doesn't add detail; it just blurs the pixels you already have. Start with a canvas sized to your final print dimensions to avoid this trap. Following these artwork requirements for t-shirt printing ensures that every fine line and texture translates perfectly from the file to the fabric.
If you need a hand getting your files ready for production, check out our clothing printing options to see how we handle professional submissions.
Optimising Designs for Specific Printing Techniques
Your design isn't a static image; it's a set of instructions for a machine. Different machines have different limits. Understanding the artwork requirements for t-shirt printing means tailoring your file to the specific ink or thread being used. If you ignore these technicalities, your final product will fail to meet retail standards. We rely on your files being print-ready to maintain our fast turnaround times. This is why following technical artwork specifications is the only way to guarantee a flawless result.
Screen Printing vs. DTF Artwork Rules
Screen printing is the industry heavyweight for bulk orders. It requires spot colours, usually matched to Pantone references. To ensure the ink passes through the mesh correctly, keep your line weights to a minimum of 1pt. Anything thinner risks 'closing up' during production. If your design has multiple colours, we use 'trapping'. This is a slight overlap of colours that prevents the garment fabric from peeking through if the press shifts by a fraction of a millimetre. Gradients in screen printing require halftones, which are small dots of varying sizes.
Direct to Film (DTF) is the king of full-colour detail in 2026. Unlike screen printing, DTF has no colour limits. It handles smooth fades and photographic gradients without the need for halftones. This makes it the perfect choice for complex band merch or intricate digital art. However, even with DTF, the 300 DPI rule remains absolute. High-resolution files ensure the film prints clearly before it's heat-pressed onto the fabric. Choosing the right method depends on your design's complexity and your budget.
Preparing Art for Custom Embroidery
Needles aren't printers. Thread has physical thickness that ink does not. Because of this, embroidery requires a 'digitised' file in formats like DST or EMB. This is a map that tells the embroidery machine exactly where to place every stitch. You cannot simply send a PNG and expect a perfect result. You must simplify your logo. Remove gradients and tiny details that a needle cannot replicate. Small text is the enemy of quality embroidery; if it's too small, it will become an unreadable knot of thread.
When we create Custom Bobble Hats or workwear, we look for bold shapes and clear contrast. If your logo is too complex, we'll ask you to simplify it. This prevents the fabric from puckering and ensures a crisp, professional finish. For sublimation on 100% polyester, you'll need 'full bleed' designs. This means the artwork extends past the trim line to ensure no white edges appear after the heat transfer process. Matching your art to the technique is the hallmark of a pro.
Sizing, Safe Zones, and Real-World Placement Guidelines
Placement defines the professional look of your merch. Even a perfect file fails if it is positioned incorrectly on the garment. These are the physical artwork requirements for t-shirt printing you must consider before the first screen is burned. Standard platens on our industrial presses are 35cm x 45cm. This is your absolute limit for any single design. If your graphic exceeds these dimensions, it simply will not fit on the machine; however, for branding projects that require much larger scales, such as banners or exhibition stands, you can turn to Colour Graphics for large format printing UK. You must design with the physical boundaries of the fabric in mind.
The 'Seam Gap' is a critical safety rule for every order. You must keep your artwork at least 2cm away from any collar, sleeve seam, or hem. If the print head or screen hits a seam, the ink deposits unevenly. This results in a blurred edge or a physical gap in the design. Professional artwork requirements for t-shirt printing exist to prevent these failures. We want your merch to look retail-ready, and that means respecting the physical limits of the garment construction.
Standard Print Dimensions and Placements
For corporate workwear and uniforms, the left chest is the industry standard. Keep these logos between 8-10cm wide. Any larger and the design starts to wrap around the armpit, which looks amateur. For a standard full-front design, 28cm is the 'sweet spot'. This width provides a bold look on a Medium but still fits comfortably on a Small without hitting the seams. If you are designing for a tour or a brand launch, check our Band Merchandise Guide for expert layout tips. We also offer nape of neck printing, which is typically 5-8cm wide and sits just below the collar for a subtle branding touch.
Scaling Art Across Different Garment Sizes
Most bulk orders use one set of screens to keep costs down. This is called 'Standard Sizing'. A design that is 28cm wide looks massive on a Small but appears much smaller on a 3XL. You must design for the middle ground. If you scale the art too large for the Small, it becomes a 'belly print' that sits too low on the torso. If you scale it too small for the 3XL, it looks like a postage stamp in a sea of fabric. If your brand requires identical scaling across every size, you'll need 'Custom Sizing'. This involves creating multiple sets of screens for different size brackets. It is a more expensive route, but it ensures total visual consistency for high-end retail results.
If you're ready to start your next bulk order, explore our custom t-shirt printing services today.
The RAW Merch Submission Protocol: Final Checklist
The RAW Merch Protocol is a system built on 25 years of industry experience. It's designed to move your order from the inbox to the press without a single delay. We don't provide graphic design services, so your file is the final set of instructions our machines receive. Following these final artwork requirements for t-shirt printing ensures your creative vision is executed perfectly. If your file is broken, your production timeline stops. We want to avoid that as much as you do.
Before you hit send, check your spelling. We print exactly what you submit. No matter how obvious a typo might seem, our automated systems won't catch it. Next, you must embed your images. If you link a file in your design software but don't embed it, our team will only see a 'Missing Link' error. Finally, perform a zoom check. Open your file and view the design at 100% zoom. If you see any artifacts or pixelation at this size, they will be visible on the final garment. Sharp files lead to sharp prints.
The 'Outlining Fonts' Step (Crucial)
Missing fonts are the leading cause of production delays in the UK. If our system doesn't have your specific font installed, it will substitute it with a generic one, which ruins your brand identity. You must 'Create Outlines' in Adobe Illustrator to prevent this. Simply select all your text, go to the 'Type' menu, and click 'Create Outlines'. Outlining fonts converts text into non-editable shapes to prevent font substitution errors. This turns your typography into vector paths that stay perfect on any computer. Sending the raw font file (.TTF) is often not enough for professional RIP software; we need shapes, not live text.
Canva Users: How to Export for Print
Canva is a popular tool, but its default settings are built for screens, not cotton. To meet professional artwork requirements for t-shirt printing, you must change your export settings. Select 'PDF Print' instead of 'PDF Standard' to ensure the highest possible resolution. If you have Canva Pro, you must check the 'Flatten PDF' and 'CMYK' options. Flattening ensures your layers don't shift during the rip process. Most importantly, toggle the 'Transparent Background' switch. Without this, your design will arrive with a solid white box that ruins the look of coloured shirts. These small steps separate amateur merch from retail-quality products.
Ready to Launch Your 2026 Merch Line?
Success in custom apparel isn't just about a great design; it's about technical precision. You now have the blueprint to navigate artwork requirements for t-shirt printing with total confidence. By mastering the vector versus raster split and respecting physical placement limits like the seam gap, you eliminate the risk of costly production errors. These standards are the difference between a blurry amateur shirt and a retail-ready masterpiece that your audience will actually want to wear.
We've spent 25+ years in the game perfecting the science of ink on fabric. With our UK-based production and pro-grade quality guarantee, we are ready to turn your print-ready files into high-impact reality. Don't let technical confusion hold back your creative vision. Follow the RAW Merch Protocol, double-check your outlines, and get your project onto the press today. Your brand deserves a flawless finish that matches your screen perfectly.
Frequently Asked Questions
What is the best file format for t-shirt printing?
Vector files are the gold standard for professional branding because they never lose quality when scaled. For screen printing, we prefer AI, EPS, or PDF formats created in software like Adobe Illustrator. If your design includes photographic elements, a high-resolution PNG with a transparent background is the best alternative. These formats ensure we meet all artwork requirements for t-shirt printing without needing to rebuild your files from scratch.
Why does my design look different on the shirt than on my computer?
Digital screens display colours using RGB light, which can create vibrant neons that physical ink cannot replicate. T-shirt printing uses the CMYK process or Pantone matching. This shift often makes colours appear slightly more muted on fabric than on a backlit monitor. To ensure the best results, always design in CMYK mode and use Pantone references for critical brand colours to maintain consistency across your entire bulk order.
Can you print a photo I found on Google or Instagram?
We cannot print images pulled directly from the web because they are usually low-resolution (72 DPI) and optimised for fast loading, not physical production. These files will appear pixelated and blurry once enlarged on a garment. Additionally, you must own the legal rights to any artwork you submit. For professional results, always provide original, high-resolution files at 300 DPI that meet our standard artwork requirements for t-shirt printing.
What is the maximum size you can print on a t-shirt?
Our standard maximum print area is 35cm wide by 45cm high, which is determined by the physical size of our industrial platens. This dimensions work perfectly for full-front designs on adult garments ranging from Small to 3XL. If you're designing for smaller items like youth tees or crop tops, we'll need to adjust the artwork size to ensure the print stays at least 2cm away from all seams, collars, and hems.
Do I need to send my artwork in CMYK or RGB?
You should always submit your artwork in CMYK mode. While RGB is perfect for digital displays, physical printing presses rely on Cyan, Magenta, Yellow, and Black inks to create your design. Submitting in RGB can lead to unexpected colour shifts when the file is processed for production. Converting your file to CMYK before submission allows you to see a more accurate representation of how the ink will actually look on the cotton fabric.
What happens if my artwork isn't high enough resolution?
Low-resolution artwork results in "staircase" edges, visible blurriness, and a total loss of fine detail in the final print. If your file doesn't meet the 300 DPI standard at the actual print size, our team will flag it as not print-ready. This will cause production delays because we'll need to wait for you to provide a higher-quality replacement. We don't provide design services, so starting with high-quality files is essential for a fast turnaround.
Can you design my t-shirt for me if I send a sketch?
RAW Merch does not provide graphic design or illustration services. We are specialists in high-volume production, UK-based fulfillment, and technical execution. To keep our workflow efficient and our turnaround times fast, we require all customers to provide print-ready digital files that meet our technical specifications. If you only have a sketch, you'll need to work with a freelance designer to create a professional vector or high-resolution raster file before placing your order.
What is a vector file and how do I get one?
A vector file uses mathematical paths instead of pixels, allowing it to be scaled to any size without losing sharpness. These files usually have extensions like .AI, .EPS, or .SVG. You can create them using professional software like Adobe Illustrator or CorelDRAW. If you don't have access to this software, a professional graphic designer can convert your existing logo into a vector format, which is essential for high-quality screen printing and embroidery applications.