
What if your next bulk order arrived exactly as you imagined it, with no blurry edges or muddy colours? Most designers fear wasting hundreds of pounds on a bad print run because they aren't sure if their artwork meets professional dtf printing file requirements. It's a common stress, especially when you're caught between SVG, PNG, and EPS formats. We know that feeling of crossing your fingers and hoping for the best. At RAW Merch, we've spent 25 years turning creative visions into high-quality physical products. We've seen every file error in the book, and we know that great merch starts with technical precision.
By mastering these standards, you eliminate the guesswork and avoid the frustration of rejected files. It's about more than just a pretty design; it's about resolution, transparency, and that critical 0.02-inch minimum line thickness. This 2026 pro guide provides a no-nonsense checklist to ensure your artwork is flawless. We'll cover why 300 DPI is non-negotiable, how to handle RGB colour spaces, and why the right file format is the difference between a pro finish and a wasted garment. Get ready to speed up your turnaround times and print with absolute confidence.
Key Takeaways
- Master the 300 DPI standard to ensure your designs remain sharp at any scale and avoid costly artwork modification fees.
- Navigate the technical dtf printing file requirements by using transparent PNGs to prevent unwanted white boxes around your artwork.
- Ensure colour accuracy across your bulk order by understanding how to manage RGB and CMYK settings for different printing methods.
- Eliminate font compatibility issues and blurry text by converting all design elements into outlines and vector shapes.
- Follow our 10-point pre-flight checklist to guarantee your files are print-ready for immediate production and faster delivery.
What is 'Print-Ready' Artwork and Why Does it Matter?
"Print-ready" is a technical term that means your file is ready to hit the press the moment we receive it. It requires zero modifications from our production team. If we have to fix your resolution, remove a background, or adjust your dimensions, it leads to "artwork fees" and pushes your delivery date back. Time is money in the merch business. Proper preparation ensures your bulk order moves straight into production without hidden costs.
Expert Tip: Always remember that 300 DPI at 10cm is not the same as 300 DPI at 40cm. If you stretch a small high-resolution image to fit the back of a hoodie, the quality will drop and the print will look blurry.
Vector vs. Raster: The Ultimate Merch Choice
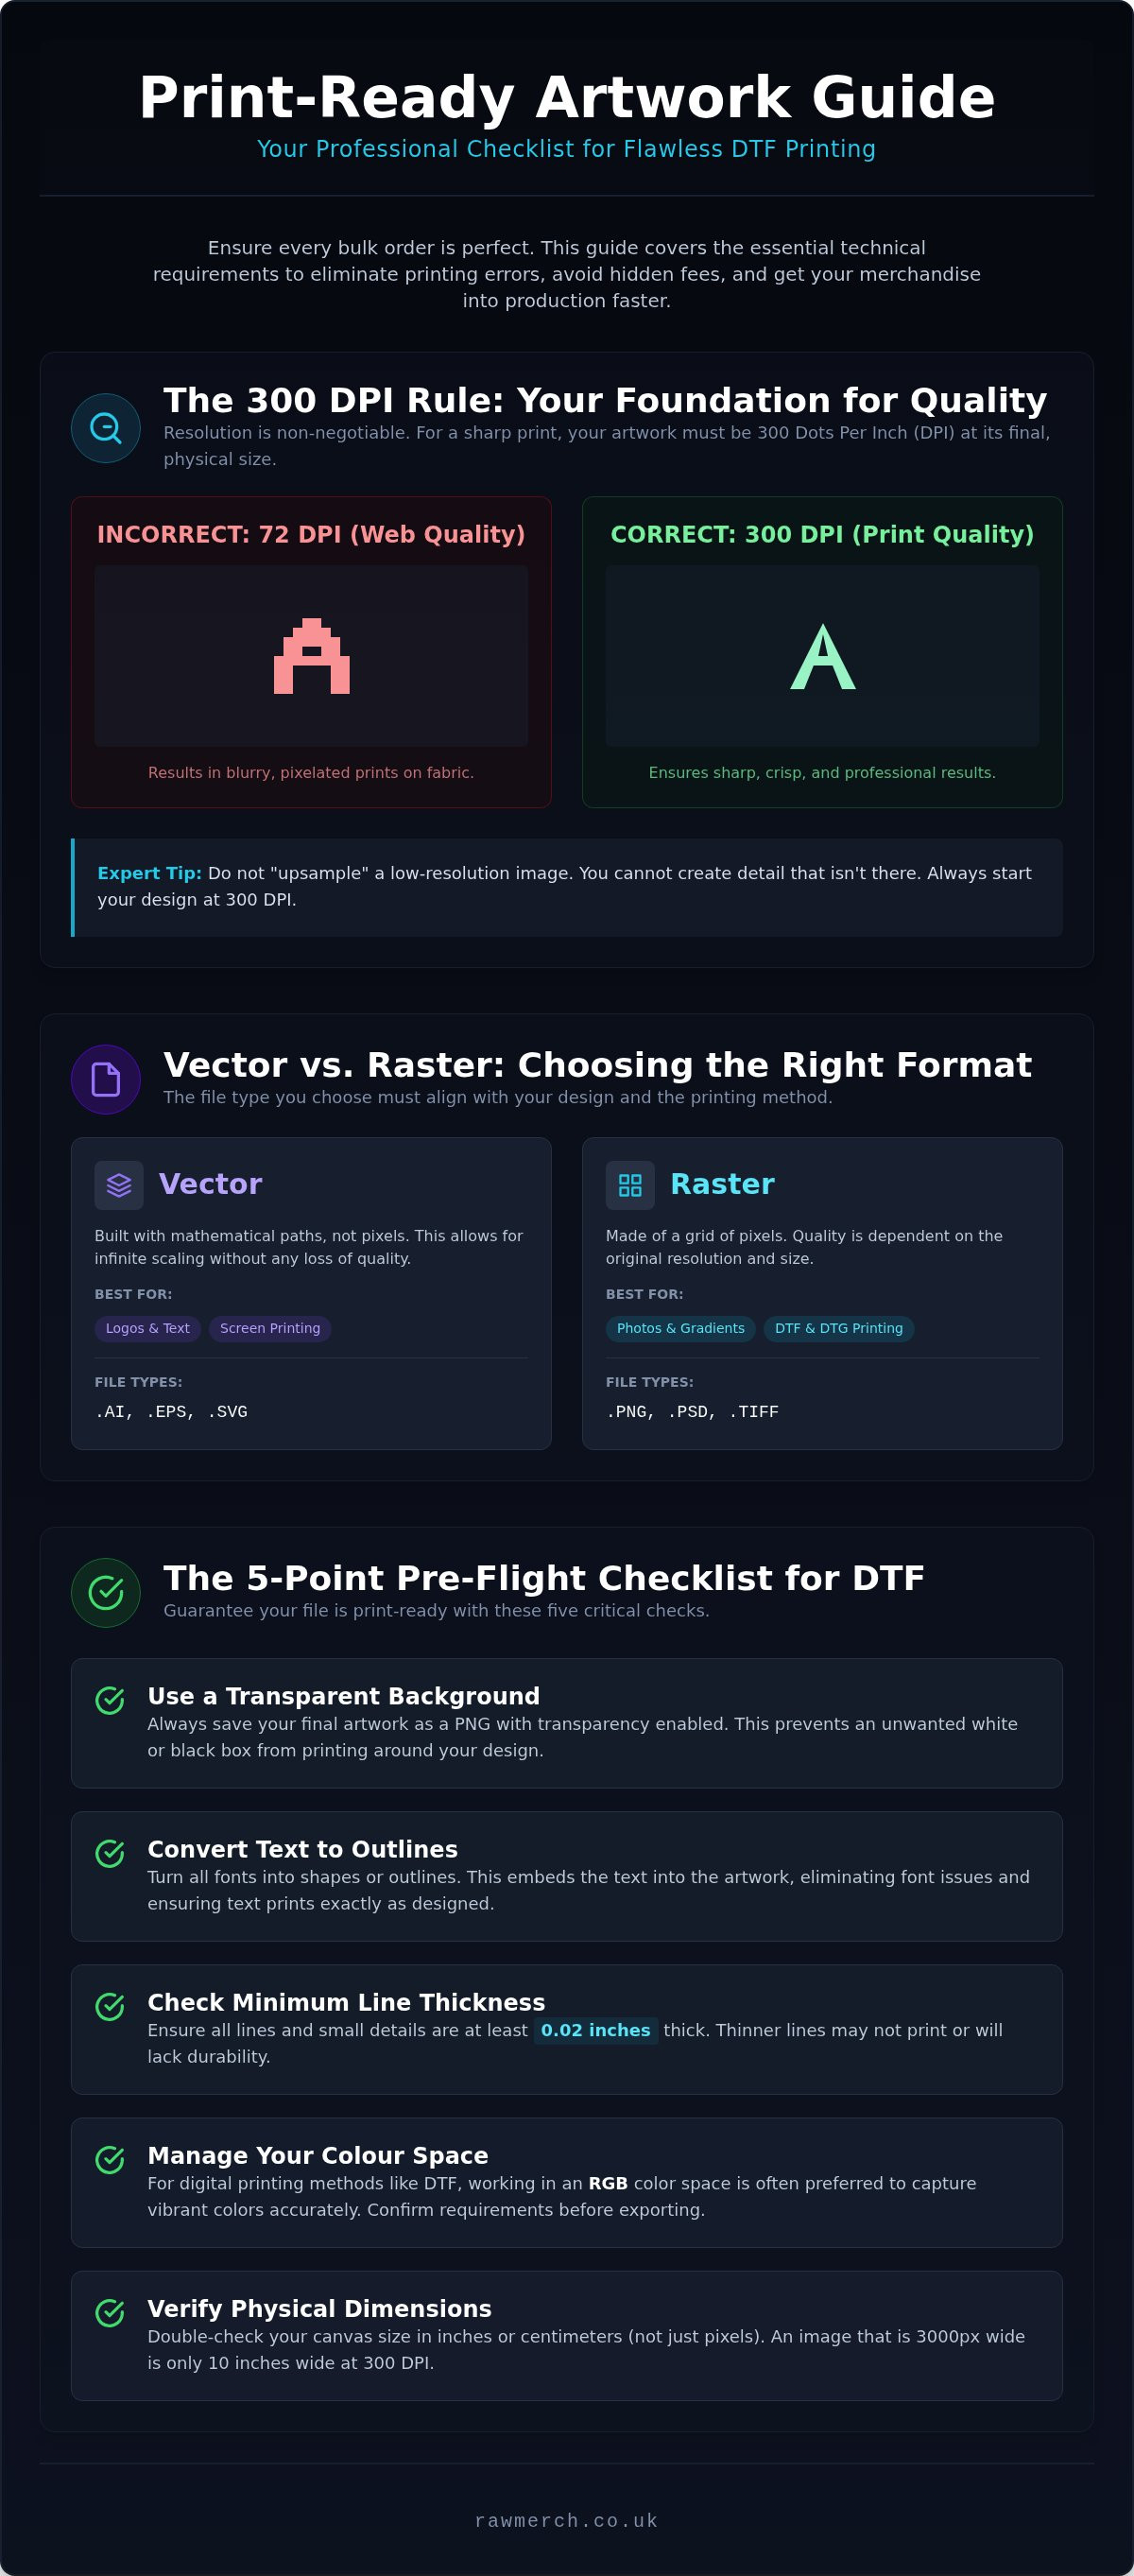
Vector files like AI, EPS, or SVG are the undisputed gold standard for screen printing. They use mathematical paths instead of pixels, allowing for "infinite scale". You can blow a vector logo up to the size of a billboard or shrink it for a pocket print without losing a single sharp line. If you are unsure about the difference, read our guide on what is a vector based image to see why they are so valuable.
While vectors are great, raster files (PSD, PNG, TIFF) are often necessary for Direct-to-film (DTF) printing. This technique excels at reproducing complex photographic details and smooth gradients that vectors struggle to replicate. We use these files to capture every nuance in a design. Just ensure your raster files are high-resolution from the start to meet professional dtf printing file requirements.
For those who want to see that same level of photographic clarity preserved as high-quality physical art, EJS Pics From the Porch provides specialized printing services to transform your digital files into professional-grade pieces.
The 300 DPI Rule: Resolution for Real-World Printing
Resolution is the biggest hurdle in professional printing. Most web images are 72 DPI. This looks fine on a smartphone but produces pixelated or fuzzy results on a garment. You need exactly 300 dots per inch (DPI) at the final print size for a professional finish. This ensures every drop of ink lands exactly where it should, creating a crisp and durable image on the fabric.
Don't try to "upsample" a low-resolution image in Photoshop by simply typing in a higher number. You cannot bake a cake from crumbs. If the original data isn't there, the software just guesses the missing pixels, resulting in a muddy, unprofessional print. Always check your physical print dimensions in Photoshop under Image > Image Size to verify your file actually measures up to your order specifications before sending it over.
Matching Your Artwork to Your Printing Technique
Your design doesn't exist in a vacuum. The file setup you choose must align with the physical machinery that will produce your garments. Each method has unique strengths and technical limitations. Beyond the visual result, consider the "hand" of the print. This industry term describes the physical weight and feel of the ink on the fabric. Screen printing often results in a heavier feel, while sublimation is completely weightless as the dye bonds with the fibres.
Preparing for Screen Printing: Spot Colours and PMS
Screen printing is the king of bulk orders. It requires a specific approach to colour management. Instead of mixing dots like an office printer, we use physical screens for each colour. You must use the Pantone Matching System (PMS) to guarantee brand consistency. This ensures the Royal Blue on your screen is exactly what appears on the final t-shirt. For more foundational tips on setting up these files, Adobe's guide to designing a t-shirt is an excellent resource for mastering colour modes and resolution.
To keep your production costs low, limit your colour palette. Every extra colour requires a new screen and more setup time. If your design features shading or shadows, we use "halftones". These are small dots of a single colour that create the illusion of a gradient without needing multiple ink buckets. This technique is perfect for vintage-style band shirts or complex monochrome illustrations.
Preparing for DTF & DTG: Transparency is King
Digital methods like Direct to Film (DTF) offer incredible freedom for complex photographic details. However, meeting the dtf printing file requirements is vital for a professional result. The most common mistake is the "Black Shirt Trap". If you submit a design with a solid black background meant for a black t-shirt, the printer will still lay down a layer of black ink. This creates a thick, plastic-feeling patch on the chest. You must remove all background colours and submit a file with a clean transparent background.
Your "alpha channel" must be perfect. This is the invisible layer that tells the printer where to apply the white ink underbase. If your edges are fuzzy or contain semi-transparent "glows", the white ink might peek out from behind the design. Clean, crisp edges are the secret to retail-ready merchandise. If you are planning a large run, our team at RAW Merch can help you choose the best clothing printing method for your specific artwork to ensure a flawless finish.
For those looking at all-over prints, sublimation is the go-to choice. This technique requires high-polyester content garments. The artwork needs to be oversized to account for "bleed", ensuring the design reaches every seam without leaving white gaps. Whether you are printing hoodies or uniforms, matching your file to the press is the only way to avoid production delays and disappointment.
Technical Essentials: Colours, Fonts, and Lines
Your design might look electric on a MacBook, but physical ink behaves differently. The biggest shock for new designers is the shift from screen light to physical pigment. While our modern software handles much of this conversion, neon colours often lose their "pop" when translated to fabric. To meet professional dtf printing file requirements, work in an RGB space as per current 2026 standards, but always preview your work with a CMYK gamut warning. This prevents your bright lime greens from turning into muddy olives during the production process.
Don't forget safety margins. We recommend keeping all critical design elements at least 2cm away from collars, seams, and hems. Printing over a seam causes ink buildup and potential cracking. By respecting these boundaries, you ensure your design sits perfectly on the garment without distortion or technical failure. Precision in the file leads to perfection on the press.
The Font Death Trap: Creating Outlines
Never send a file with "live" text. If our production system doesn't have your specific indie band or corporate font, it will automatically replace it with a generic substitute. This ruins your branding instantly. In Adobe Illustrator, select your text and use the shortcut Shift+Ctrl+O to convert it into paths. This turns your letters into solid vector shapes that remain consistent on any computer in the world.
Pay close attention to kerning. Letters that look fine on a high-resolution screen can blur together when printed on the textured surface of a soft hoodie. Give your characters room to breathe. Legibility at a distance is the hallmark of professional merchandise. If your audience can't read the text from across the room, the design isn't working. Clear, outlined paths are non-negotiable for a retail-quality finish.
Stroke Weights and Small Details
Fine lines are the first thing to fail in a wash test. For dtf printing file requirements, ensure every line and small detail has a minimum thickness of 0.02 inches. Anything thinner than a 0.5pt stroke is in the "danger zone". These tiny elements simply don't have enough surface area to bond securely with the fabric fibres. If the ink can't grip the shirt, it will peel off after a few cycles in the wash.
We also have to account for "spread". When ink hits cotton, it expands slightly. If your details are too crowded, they will bleed into each other and lose definition. Perform a "100% Zoom" sanity check on your monitor before submitting. If the details look cramped at actual size, they will definitely look cluttered on a t-shirt. We want your designs to last for years, not just until the first laundry day. Proper line weights are the secret to that long-term durability.
Your 10-Point Pre-Flight Artwork Checklist
Before you hit send, you need a bulletproof verification process. Even seasoned designers make small mistakes that can derail a bulk order. Following a strict pre-flight checklist is the best way to meet dtf printing file requirements and ensure your merchandise is produced without delay. Don't leave your quality to chance. Use these ten steps to guarantee your files are press-ready from the moment they land in our inbox.
- Step 1: Verify the physical print size matches your order. Never assume the canvas size in your software is the actual size we will print.
- Step 2: Convert all text to outlines or shapes. This prevents font substitution errors that ruin your branding.
- Step 3: Check your resolution. You need a 300 DPI minimum at the final physical size to avoid pixelation.
- Step 4: Set your colour mode to CMYK or specify exact Pantone references for brand-critical colours.
- Step 5: Remove all hidden layers and stray anchor points. These can cause "ghost" prints or machine errors.
- Step 6: Ensure backgrounds are 100% transparent. Any solid white or black background will be printed as ink.
- Step 7: Validate minimum line weights. Every detail must be at least 0.02 inches thick to bond with the fabric.
- Step 8: Respect safety margins. Keep your design at least 2cm away from seams and collars.
- Step 9: Flatten complex transparencies and rasterise glows to ensure they print exactly as they appear on screen.
- Step 10: Perform a final 100% zoom check. If it looks messy on your screen, it will look messy on the shirt.
Naming and Saving Your Files Like a Pro
Organisation is the hallmark of a professional. We recommend a clear naming convention like 'ClientName_Design_Size_V1'. This helps our production team track your files through our UK-based facility with zero confusion. While we accept various formats, we prefer .AI, .PDF, or .EPS for vector work. Organise your layers logically by keeping foreground elements separate from background details. This structured approach allows our experts to review your file quickly and catch potential issues before they hit the press.
The Mockup vs. The Print File
Always send a visual mockup alongside your raw artwork. A mockup shows us exactly how you want the finished product to look. It's the blueprint for our production team. Be specific about placement, whether it's 'chest centre,' 'nape of neck,' or 'sleeve.' If you're building a brand, check out our Band Merchandise: A Complete Guide for more tips on professional design standards. Ready to start your next run? Get your custom clothing printing quote today and let our 25 years of expertise handle the rest.
Final Handoff: Let RAW Merch Handle the Rest
Preparing your files is only half the battle. The final step is trusting your vision to a partner who understands the high stakes of bulk production. With over 25 years of industry experience, RAW Merch acts as your technical safety net. We don't just hit 'print' and hope for the best. Every file that enters our system undergoes the RAW Merch Review. Our experts check your dtf printing file requirements against our high-spec machinery to ensure the final result matches your original concept. We've seen every possible file error, from missing bleed to incorrect colour profiles, and we catch them before they cost you money.
We specialise in high-volume logistics for touring bands and corporate uniform rollouts across the United Kingdom. Whether you need 50 shirts for a local event or 5,000 for a nationwide campaign, our facility is built for scale. We catch the small errors that less experienced printers miss; saving you from the heartbreak of a rejected bulk order. If you're managing a complex tour schedule or a large-scale business rebrand, you need a partner who prioritises execution. Ready to start? Get your bulk merchandise quote today and experience the difference that professional oversight makes.
Why Experience Matters in Bulk Printing
Consistency is the biggest challenge in bulk printing. If you're ordering 500 hoodies, the last one should look exactly like the first. Our 25-year legacy in screen printing and digital techniques means we've mastered the art of repeatability. We understand the specific pressure touring artists and high-growth businesses face. You need your merch on time, every time, without quality dips. By keeping our production and distribution entirely UK-based, we maintain total control over your schedule and the final product's durability. We don't outsource our quality; we build it right here in our own workshop. This hands-on approach is why bands and businesses trust us with their most important creative assets.
Next Steps: From Design to Delivery
We believe in total transparency throughout the customer journey. Once you submit your files and meet the dtf printing file requirements, you won't be left in the dark. Our approval process ensures you see a digital proof before a single drop of ink hits the fabric. This is your final chance to verify placement and colour accuracy. Beyond printing, we offer end-to-end fulfilment and distribution services for online stores. We can store your stock and ship it directly to your customers; allowing you to focus on your creative work while we handle the heavy lifting. Don't let technical errors or logistical hurdles slow you down. Contact our team now to turn your designs into professional-grade merchandise that stands the test of time.
LAUNCH YOUR NEXT MERCH RUN WITH TOTAL CONFIDENCE
Mastering the technical side of design is the only way to guarantee a flawless finish. You now know that 300 DPI is the non-negotiable standard for clarity and why converting text to outlines is vital for brand consistency. By meeting the specific dtf printing file requirements, you eliminate the stress of rejected orders and hidden artwork fees. Your creative vision deserves a physical product that matches its quality. Don't let a simple file error stand in the way of your next successful launch.
At RAW Merch, we bring 25 years of industry experience to every project. We're specialists in bulk orders and band merch; providing reliable UK-based production from our dedicated facility. We catch the small details that others miss, ensuring your hoodies and t-shirts are retail-ready. It's time to stop worrying about the press and start focusing on your brand. Our team is ready to turn your files into high-quality merchandise that your audience will love to wear.
Get a Fast Quote for Your Custom Merch Now
Frequently Asked Questions
Can I use a photo from my phone for t-shirt printing?
Yes, but the photo must be high-resolution and taken in excellent lighting. While modern smartphones capture high pixel counts, they often struggle with the 300 DPI density needed for large-scale garment printing. We review every submission to ensure your images won't appear grainy or blurred. If the quality isn't there, we'll let you know before the ink hits the fabric to avoid a poor result.
What is the best software for preparing t-shirt artwork?
Adobe Illustrator and Photoshop are the top choices for professional-grade merch design. Illustrator handles vectors perfectly for sharp logos, while Photoshop is the king of high-resolution photographic prints. These tools give you the control needed to meet dtf printing file requirements precisely. If you use free tools, always ensure you export at full size with a 300 DPI setting to maintain quality across your bulk order.
Why do my colours look different on the shirt than on my monitor?
Screens use light (RGB) to create colour, while fabric uses physical ink (CMYK). This fundamental difference means what you see on a glowing monitor won't always match the matte finish of a t-shirt. Neon and very bright shades are particularly prone to looking slightly muted in print. We recommend using specific Pantone colour codes if your brand requires an exact match across your entire bulk order for consistency.
Do I need to leave a transparent background for my design?
Yes, you must remove all background layers and submit your file with 100% transparency. If your design includes a white box on the screen, the printer will lay down white ink on the garment. This is a critical part of dtf printing file requirements that prevents your design from looking like a thick, uncomfortable patch. Always save your final artwork as a transparent PNG or a high-quality PDF to ensure a pro finish.
What happens if my artwork is not high enough resolution?
Your print will look blurry or jagged if the source file lacks sufficient detail. Low-resolution images are made of fewer pixels, which become visible as blocks when enlarged for a t-shirt. We catch these resolution errors during our expert review process to save you from a disappointing result. It's impossible to add detail back into a low-res image, so always start with the highest quality original possible for your design.
What is the maximum size I can print on a standard t-shirt?
The maximum print area for most adult t-shirts is approximately 35cm wide by 45cm high. This size ensures the design remains visible and doesn't wrap awkwardly around the sides of the body. We adjust the scale based on your smallest garment size to maintain a consistent look across your entire order. Proper scaling keeps your artwork away from seams where ink buildup can cause durability issues over time after multiple washes.
Can I use copyrighted images if I am only making a few shirts?
No, you cannot legally print copyrighted material without explicit permission from the owner. This rule applies whether you are printing a single shirt for yourself or a bulk order for a business. We respect intellectual property rights and require our clients to provide original or licensed artwork. Using royalty-free assets or creating your own designs is the safest way to ensure your project moves through production without any legal delays.
How do I specify exactly where I want the design on the shirt?
You should provide a visual mockup that clearly shows the intended position and scale of your artwork. Don't just send the raw file; include a secondary image of the design placed on a t-shirt template. Use specific measurements, such as "5cm down from the neck ribbing", to guide our team. This clear communication ensures our UK-based production crew hits the mark on every single garment in your custom run.