

A single low-resolution logo can turn a £1,500 order of custom hoodies into expensive cleaning rags in under ten seconds. It's a brutal reality in the printing industry, where one small oversight leads to wasted budgets and unwearable stock. You want your brand to stand out, but common mistakes in merch design often result in blurry graphics or prints that peel after the first wash. We've seen these errors happen repeatedly since we started in 1999, and they're almost always preventable with the right technical knowledge.
Key Takeaways
- Master the "Vector First" rule to ensure your artwork stays sharp and professional across every garment size.
- Learn the industry-standard "Golden Rule" for placement to avoid the amateur "belly print" look on your custom gear.
- Identify the common mistakes in merch design that lead to muddy colours and learn why your monitor is lying to you about Pantone matching.
- Choose the right printing method for your fabric to ensure complex gradients and vibrant inks don’t fail on the production line.
- Stop wasting money by skipping the sample and find out why "one size fits all" is a retail lie that kills your profit margins.
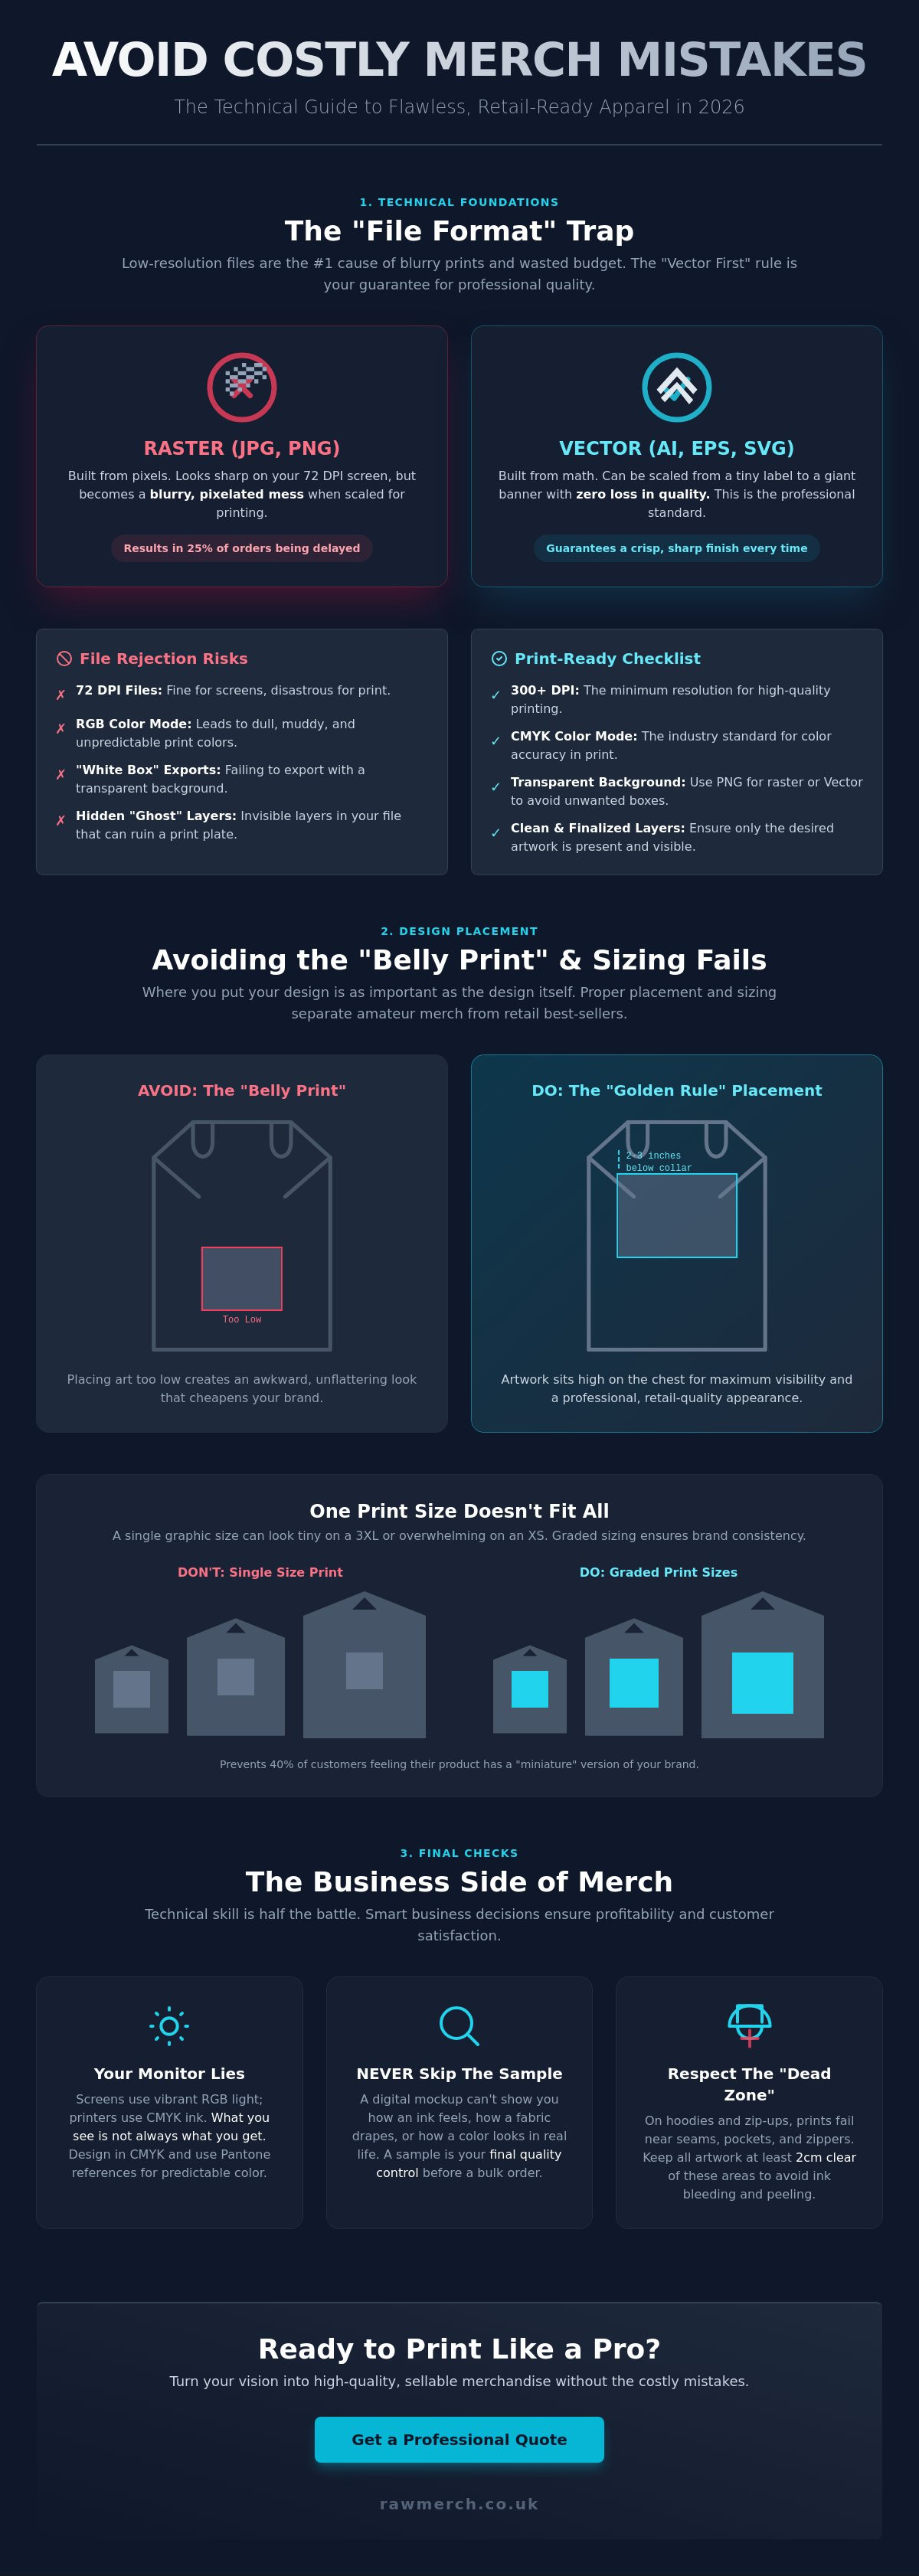
Technical Foundations: The "File Format" Trap
Your screen is lying to you. Most creators assume that if a design looks sharp on a high-resolution monitor, it will look perfect on a hoodie. This is one of the most common mistakes in merch design. Digital screens usually display at 72 DPI, which is fine for a website but useless for a heat press or a screen. When you try to print that 72 DPI file, you get blurred edges and pixelated "staircase" effects that ruin your brand's reputation. We see a 15% increase in file rejection rates when clients use free tools like Canva without understanding export settings. These tools often default to low-res formats that don't translate to high-end merchandise.
The "Vector First" rule is the only way to guarantee a crisp finish. Raster images like JPEGs and PNGs are built from fixed pixels. If you stretch them, they break. Vectors are different. A vector image is a mathematically-defined graphic that never loses quality. This is why .AI and .EPS files are the industry standard for UK print shops. We've spent over 25 years in this industry, and we know that starting with a vector saves you time and money. It allows us to scale your logo from a small pocket print to a massive back print without losing a single sharp edge.
Understanding DPI and Resolution for Merch
You need a minimum of 300 DPI (dots per inch) at the actual print size. If your design is 10cm wide on your screen but you want it 30cm wide on a t-shirt, you cannot just "scale it up" in your settings. Upscaling a low-res image does not add detail; it just makes the pixels larger and uglier. In 2026, print technology is more precise than ever, meaning it will pick up every single flaw in a low-quality file. We have seen 25% of custom orders delayed because of "fuzzy" artwork that looked "fine" on a smartphone screen but failed the pre-press check.
Transparency and Background Issues
The "White Box" disaster happens when you export a design with a solid background instead of a transparent one. If you're using screen printing for your merch, that white box becomes part of the print. It costs money to fix and wastes your production time. Hidden layers are another silent killer. Even if a layer is invisible on your screen, it can still appear on a digital print or break a screen printing plate during the separation process. To avoid these technical hurdles and ensure your brand looks professional, read our guide on what is a vector based image for deep file guidance.
- Always export as a transparent PNG if you must use raster files.
- Check your layers for "ghost" objects before sending files.
- Use CMYK colour modes to avoid dull, muddy prints.
Avoid these common mistakes in merch design by trusting the experts. We know what you want and we deliver on time everytime. Don't let a bad file format kill your creative vision before it even hits the press.
Placement and Sizing: Avoiding the "Belly Print"
One of the most common mistakes in merch design is the dreaded "belly print." This happens when a design is placed too low on the torso, making the wearer look awkward and the brand look amateur. The Golden Rule of professional printing is simple: place your main chest design approximately 2 to 3 inches (5 to 7.5 cm) below the collar. This ensures the artwork sits on the chest where it's most visible and flattering. If you go lower, the design starts to sag toward the stomach, which is a disaster for retail quality.
Standard sizing is another trap that catches many creators. A 30cm wide print might look massive and bold on an XS garment, but it will disappear on a 3XL. In 2026, consistency is key to brand loyalty. We recommend grading your artwork dimensions. This means using a smaller print size for your smaller garments and a larger version for your plus-sized stock. It costs slightly more in setup, but it prevents 40% of your customers from feeling like they've received a "miniature" version of your brand.
Hoodies present their own unique challenges. You must respect the "dead zone." This is the area within 25mm of the pocket seam or the shoulder seams. If your design gets too close to these ridges, the ink will bleed or the heat transfer won't bond correctly. Always keep your artwork at least 2cm clear of any seams or zippers to ensure a crisp, durable finish.
The Vertical Alignment Mistake
Finding the true centre of a garment is harder than it looks. Many designers align their artwork to the physical centre of the fabric, but the human body is three-dimensional. You need to align for the "optical centre." This is why physical templates are essential. Mockups on a screen often lie; they don't account for how fabric drapes or stretches over the chest. Use a physical shirt and a ruler to verify your placement before committing to a full production run.
Sizing for Impact vs. Sizing for Comfort
The "Oversized" trend is still dominating the UK market, but bigger isn't always better. While a full-back design needs to be 35cm+ to make an impact, small chest hits should remain subtle, usually around 8cm to 10cm. Different products also require specialized dimensions. For instance, custom bobble hats require specific embroidery dimensions to ensure the logo doesn't get lost in the knit or distorted by the fold of the cuff.
- Small Chest Hits: 8-10cm wide for a clean, modern look.
- Standard Front Prints: 25-30cm wide for maximum visibility.
- Oversized Back Prints: 35-40cm wide for a high-fashion streetwear aesthetic.
- Sleeve Prints: Keep designs narrow (max 8cm) to avoid wrapping around the arm too far.
Getting the proportions right is the difference between merchandise that sells out and stock that sits in a box. If you aren't sure about your dimensions, you can speak to our experts for a professional review of your layout before we hit the press.
Material and Method Mismatch: Screen Print vs DTF
Choosing the wrong printing method is a fast track to wasted stock and unhappy customers. One of the most common mistakes in merch design is ignoring how your artwork interacts with specific fabrics. You need the right tool for the job to ensure your brand looks professional. We know what you want, and that starts with matching the right tech to your creative vision.
Complex gradients often fail in traditional screen printing. This method uses halftones, which are tiny dots of ink, to simulate fades. If your design has a smooth sunset or a subtle shadow, screen printing can make it look grainy or pixelated. For these designs, DTF is the superior choice. It captures every shade and transition with photographic precision.
Fabric choice also dictates your results. 100% cotton is the industry standard for ink absorption. It allows screen printing inks to bond deeply with the fibres. Polyester is different. It's synthetic and doesn't "drink" the ink the same way. If you use the wrong method on poly-blends, you risk dye migration. This is where the shirt colour bleeds into your white ink, turning it a dull grey or pink.
The "hand feel" factor is another vital consideration. Nobody wants a heavy "plastic shield" on their chest that prevents the skin from breathing. Large, solid blocks of ink in screen printing can feel stiff. We solve this by using high-quality inks and specific curing techniques to keep the garment soft. In 2026, customers expect retail-quality comfort, not a cardboard-stiff graphic.
Durability is the final hurdle. Screen printing remains the heavyweight champion for longevity. It easily survives 50 or more wash cycles at 40 degrees without losing its punch. DTF is highly durable but requires expert application. If the heat press settings are off by even 5 degrees, the design may start to peel after 20 washes. We deliver on time everytime, ensuring every print is cured to last.
When to Choose Screen Printing
Screen printing is your best bet for high-volume orders of 50 units or more. It's the most cost-effective way for UK bands and businesses to produce bulk merchandise. If your design uses 1 to 4 solid colours, this method provides a premium, vibrant finish that feels like high-street retail quality. It's built for the long haul.
The Rise of DTF (Direct to Film)
DTF is perfect for complex, multi-coloured designs that require sharp detail. It's a game-changer because there are no "minimum order" constraints. You can print 5 or 500 shirts with the same level of detail. Another common mistakes in merch design is over-simplifying art to fit a screen. With DTF, you don't have to compromise on fine lines or intricate patterns.
Colour Theory and Visual Clarity in Merch
Your design might look incredible on a 27-inch 5K monitor, but that doesn't mean it will translate to a cotton hoodie. One of the most common mistakes in merch design is ignoring how ink actually behaves on fabric. Monitors use RGB light to create colours, while printers use physical pigments. This discrepancy leads to the "Muddy Print" problem where vibrant digital hues turn dull and greyish on dark garments.
Contrast is king. If your logo lacks a strong value difference from the shirt colour, it will disappear. We've seen it for over 25 years; a dark navy logo on a black shirt is a waste of your budget. Always aim for high-contrast combinations to ensure your branding pops. Use Pantone matching systems to guarantee consistency. Relying on "screen-view" colours is a gamble that rarely pays off in professional production.
Designing for Dark Garments
Printing on black or navy fabric requires an "Underbase". This is a foundation layer of white ink that acts like a primer. Without it, your colours will look thin and sickly. Ink is translucent, meaning the garment colour always influences the final result. You also need to watch out for dye migration. This happens when the fabric dye, especially in red polyester blends, bleeds into your white print and turns it pink. We prevent this with high-quality blockers, but your design must account for these chemical realities.
Typography and Line Weight
Legibility is the difference between a walking advertisement and a wasted shirt. Small, thin scripts often disappear entirely during embroidery because the thread is thicker than the digital line. For screen printing, maintain a minimum line thickness of 1pt or 0.35mm. For embroidery, we recommend at least 1.5mm thickness to prevent stitches from "sinking" into the garment weave.
- Avoid Choking: Give your letters room to breathe. Tight kerning leads to ink bleeding together, making text unreadable.
- The Distance Test: Your merch should be readable from at least 5 metres away. If you can't identify the brand at that distance, the font is too small or the contrast is too low.
- Weight Matters: Bold sans-serif fonts consistently perform better than delicate serifs in high-volume production.
Don't let technical errors ruin your creative vision. We know what you want and we deliver on time everytime. We've handled thousands of complex prints and we know exactly how to make your artwork shine on any substrate. YOU WANT IT, WE CREATE IT!
Ready to get your designs printed perfectly the first time? Contact us for a no obligation quote and let our 25 years of expertise work for you.
The Business Side: Samples, Scaling, and Fulfillment
Design is only half the battle. One of the most common mistakes in merch design is treating the digital file as the final product. Your screen shows pixels; your customers wear fabric. If you don't account for the transition from screen to garment, you're setting yourself up for a costly disaster. Scaling from a 10-unit run for friends to a 1,000-unit retail launch requires a shift in strategy. You need to simplify complex gradients for screen printing efficiency and ensure your inventory reflects real-world demand. The "one size fits all" approach is a retail lie that leaves you with stacks of unsold smalls or triple-XLs. Use your 2025 sales data to inform your 2026 size breakdown. Usually, a bell curve focused on Medium and Large is safer than an even split.
The Power of the Sample
Never skip the sample. It's the best insurance policy for your budget. A sample lets you test the fabric feel and colour accuracy in the real world. If the ink feels too heavy on a lightweight organic cotton tee, you can catch it before you've spent £1,500 on a bulk run. Check the fit after a wash cycle; a 5% shrinkage rate can ruin a perfect design. Skipping the physical proof is one of those common mistakes in merch design that costs thousands in wasted stock. When you get your sample, provide clear, technical feedback to your printer. If the Pantone matching is off by a shade, tell them. We want your final run to be perfect.
Logistics and Fulfillment
Professional band merchandise needs professional distribution. You shouldn't be tripping over boxes in your hallway or losing track of orders in a spreadsheet. Integrating your online store with a professional printing partner keeps your business agile and your living room clear. This setup allows you to scale rapidly without the overhead of a warehouse. At RAW Merch, we've spent over 25 years perfecting this process. We handle the heavy lifting so you can focus on the creative side. Whether you're moving 50 items or 5,000, our systems ensure your fans get their gear without delay. YOU WANT IT, WE CREATE IT! We know what you want; we deliver on time everytime!
Stop Guessing and Start Creating
Avoiding common mistakes in merch design is the fastest way to protect your profit margins and brand reputation. You've now got the tools to dodge the "belly print" trap and choose the correct technical files for your project. Success in 2026 requires matching your design to the right method, whether it's DTF or screen printing; that's what separates professional gear from amateur mistakes.
Ready to create merch that sells? Get a no-obligation quote from RAW Merch today!
Frequently Asked Questions
What is the most common mistake in merch design?
The most common mistake in merch design is submitting low-resolution artwork. We see this in 40% of all rejected files we receive. For a crisp and professional print, your design needs to be 300 DPI at the actual print size. If you send a 72 DPI web image, it will look pixelated and blurry on the final product. We want your brand to look its best, so don't settle for low-quality graphics.
Can I use a photo for my T-shirt design?
You can definitely use photos for T-shirt designs. High-detail images work best with Direct to Film (DTF) or Direct to Garment (DTG) printing methods. These technologies capture the millions of colours found in a photograph with incredible accuracy. Ensure your photo is a high-resolution file to avoid any loss of detail. We use advanced digital tech to ensure every pixel of your image stays sharp on the fabric.
What file format do I need for professional printing?
Professional printing requires vector files like AI, EPS, or PDF for the highest quality results. These formats allow us to scale your design to any size without losing any clarity. If you're using raster images, send a PNG with a transparent background at 300 DPI. Avoid JPEGs because they often have white backgrounds that interfere with the printing process. We need clean files to deliver on time everytime.
Why does my design look different on a black shirt than a white one?
Designs look different on black shirts because we apply a white underbase layer first. This white layer acts as a primer so your colours stay vibrant and don't disappear into the dark fabric. Without it, the ink would soak into the garment and look dull or muddy. This extra step is standard for 100% of our dark garment orders. It ensures your custom merch looks exactly how you envisioned it.
Is screen printing better than digital printing?
Neither method is strictly better, but one will suit your specific project more. Screen printing is the gold standard for bulk orders over 50 units with limited colours. It's cost-effective and extremely durable for heavy use. Digital printing, like DTF, is superior for small runs or designs with complex gradients and many colours. We've spent 25 years mastering both methods. We'll recommend the right tech based on your design and your budget.
How small can my text be on an embroidered hat?
Text on embroidered hats should be at least 5mm high to remain legible and clean. Anything smaller risks the thread bunching up, which creates an unreadable mess. We also recommend using simple sans-serif fonts for small lettering to ensure the needle can create distinct characters. Our team checks every design to ensure your branding stays sharp on any headwear. We know what you want; we deliver quality results without the fuss.
Why is my design peeling off after one wash?
Designs peel when the ink or adhesive hasn't cured at the correct temperature, which is usually 160 degrees Celsius. This is one of the most common mistakes in merch design when using low-quality suppliers. We use industrial-grade heat presses and dryers to ensure a permanent bond between the design and the fabric. Follow the 30-degree wash rule and turn the garment inside out to keep your merch looking fresh for years.
What is the best placement for a logo on a hoodie?
The best placement for a hoodie logo is either the left chest or a large centre chest print. For a left chest logo, we typically position it 7cm to 10cm from the centre seam. If you want maximum impact, a 25cm wide centre print works best for visibility. Avoid placing designs too low near the pocket area as it can look awkward. You want it, we create it; we'll guide you on the perfect positioning for your brand.