
A single low-resolution file can cost you £50 in unnecessary art setup fees and three days of production delays. You've likely spent hours perfecting your design, so the last thing you want is a printer telling you it's too pixelated or "fuzzy" to use. We know how frustrating it is to deal with blurry edges or colours that don't match what you saw on your screen. You want your custom merchandise to look exactly as you envisioned it without the technical headache or the extra costs.
Mastering the best file format for t-shirt printing is the fastest way to ensure your gear looks professional and arrives on time everytime. This pro guide for 2026 gives you the exact specifications we use at RAW Merch to deliver high-quality results for every client, based on our 25 years of industry experience. We're going to explain the difference between vector and raster files, clear up the CMYK vs RGB confusion, and show you how to avoid those annoying rejections. You want it, we create it; let's get your artwork ready for production right now.
Key Takeaways
- Eliminate pixelation and blurry edges by mastering the "Garbage In, Garbage Out" principle for professional-grade results.
- Identify the best file format for t-shirt printing to ensure your logos stay razor-sharp and your photos remain vibrant.
- Match your artwork to the right method, from vector-heavy screen printing to high-resolution PNGs for Direct to Film (DTF).
- Follow our professional checklist to lock in 300 DPI resolution and convert fonts to outlines, preventing common production errors.
- Leverage 25 years of expert knowledge with a "no-nonsense" art check that ensures your custom merch looks elite every time.
Why the Right File Format for T-Shirt Printing Matters
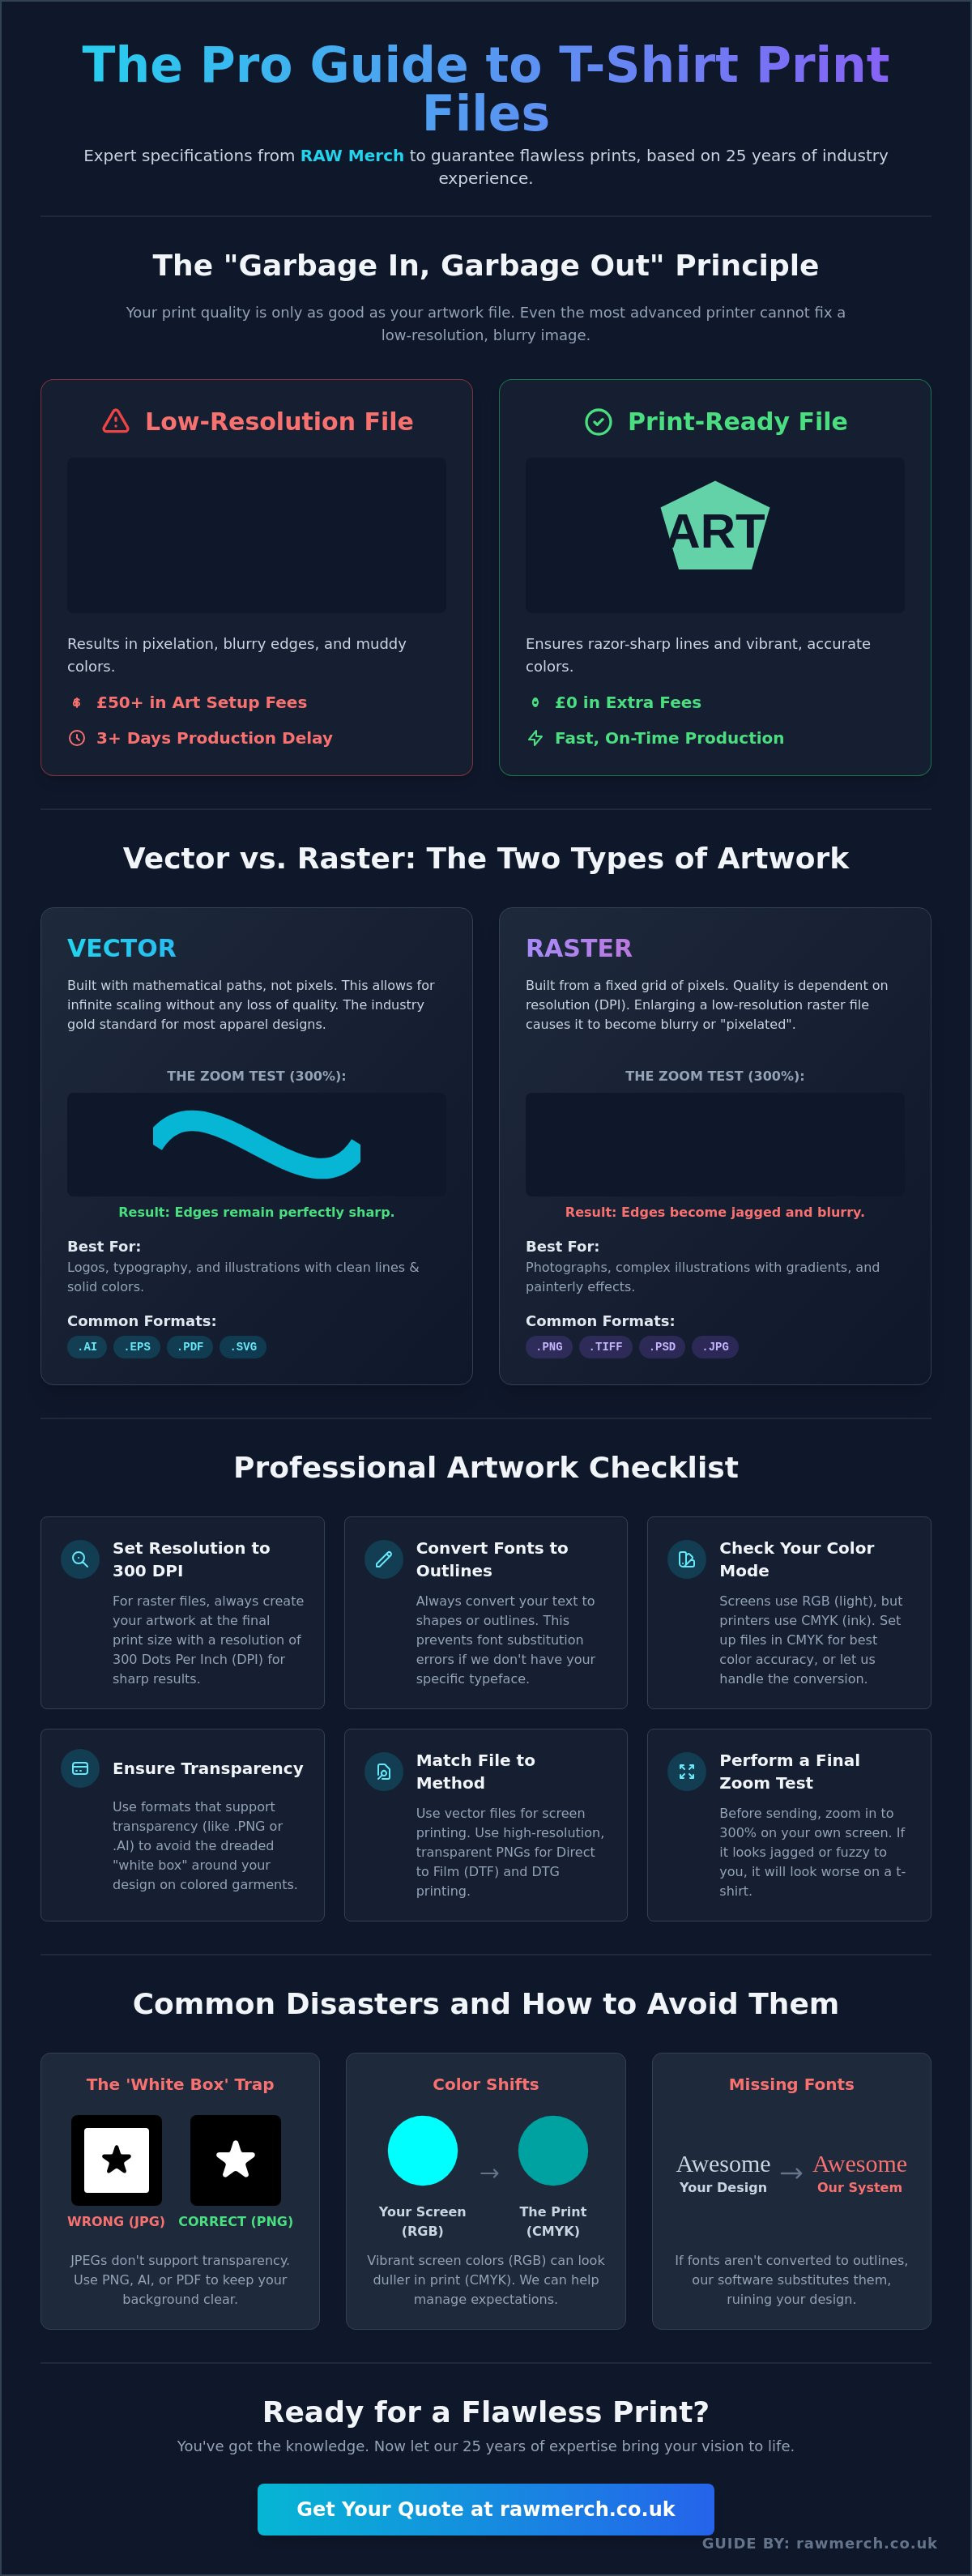
At RAW Merch, we have spent 25 years mastering the art of custom clothing. We know what you want, and we deliver on time everytime! One hard truth remains constant across two decades of industry shifts: your print is only as good as your artwork. We call it the 'Garbage In, Garbage Out' principle. Even the most advanced £50,000 DTG printer cannot fix a low-resolution, grainy file. If you provide a poor image, you will get a poor result.
Using the wrong format leads to visible pixelation, blurry edges, and muddy colours that lack punch. This isn't just an aesthetic issue; it's a financial one. Low-quality files often require professional art reconstruction, which can cost between £30 and £60 per hour in studio fees. If you approve a proof based on a bad file, you risk wasting hundreds of pounds in premium stock. Getting the best file format for t-shirt printing right from the start saves your budget and your brand reputation.
Resolution vs. File Extension
A common mistake is assuming a .PDF or .EPS extension automatically means high quality. These are often just containers. If you drag a tiny, 72dpi thumbnail into a PDF, it stays a tiny thumbnail. Understanding the fundamental difference between Vector vs. Raster graphics is vital for professional results. What looks crisp on a 6-inch smartphone screen often falls apart when scaled to a 30cm chest print. Use the 'Zoom Test' at home. Open your file and zoom in to 300%. If the edges look jagged or fuzzy, it will look even worse on cotton.
Common Printing Disasters to Avoid
Avoid the 'White Box' trap. JPEGs don't support transparency. Printing one on a black hoodie results in an ugly white rectangle around your logo. We see this daily. Colour shifts are another hurdle. Screens display in RGB (light), but we print using CMYK (ink). Without the correct setup, your electric neon blue might turn into a dull navy. Finally, always outline your fonts. If our systems don't have your specific typeface, the software swaps it for something generic, ruining your design. YOU WANT IT, WE CREATE IT! But we need the right foundation to make it happen.
Vector vs. Raster: Choosing the Best Format for Your Design
You need the right foundation for a perfect print. Choosing the best file format for t-shirt printing starts with understanding the two distinct categories of digital art: vector and raster. At RAW Merch, we've spent 25 years handling every file type imaginable. We know that the wrong choice leads to blurry edges and wasted stock. You want your merch to look professional, so you must start with the correct file structure.
Vector graphics are the industry gold standard for logos, typography, and bold illustrations. Instead of pixels, they use mathematical paths. This unique structure allows for infinite scalability. You can resize a vector logo from a small 50mm chest badge to a massive 12-foot event banner without losing a single drop of clarity. If your design features clean lines and solid colours, vector is your only choice.
Raster graphics are different. They're built from a fixed grid of pixels. You'll need these for photographs or complex, painterly illustrations that feature gradients and shadows. However, raster files are resolution-dependent. If you try to enlarge a low-resolution raster image, it will become "pixelated" and blocky. For professional results, your raster files must be created at the final print size with a resolution of at least 300 DPI (dots per inch).
| File Extension | Category | Best Application |
|---|---|---|
| .AI | Vector | Master logos and complex branding |
| .PNG | Raster | DTG and DTF prints with transparency |
| Hybrid | Universal high-quality print delivery | |
| .TIFF | Raster | High-end photographic screen printing |
Deep Dive into Vector Formats (AI, EPS, PDF)
Adobe Illustrator (.AI) is the industry favourite for custom t-shirt printing. It keeps your layers organised and your lines sharp. If you're working with a professional designer, this is the file you should request. Encapsulated PostScript (.EPS) acts as a universal vector format. It's perfect if you're using older software or need to move files between different design platforms. High-Quality Print PDFs are incredibly effective if they're exported correctly from vector software. They're easy to preview but keep the underlying math intact for our printers. You can learn more about what is a vector based image to ensure your artwork is retail-ready.
Mastering Raster Formats (PNG, TIFF, PSD)
PNG is the king of transparency. It's the essential format for Direct to Garment (DTG) and Direct to Film (DTF) printing because it allows us to print your design without a white box around it. TIFF is the choice for pros handling high-end photographic screen prints. It's an uncompressed format, meaning it preserves every bit of detail from the original file. You should almost never submit a JPEG for professional merch. JPEGs use "lossy" compression. Every time you save them, the quality drops and creates "noise" around the edges of your design. We know what you want, and it isn't a blurry logo. Check out our custom merchandise options to see how we turn these professional files into high-quality gear.
Matching File Types to Printing Methods
Choosing the best file format for t-shirt printing isn't a one-size-fits-all decision. Your choice depends entirely on the machinery we use to bring your vision to life. At RAW Merch, we've spent over 25 years perfecting these processes. We know that the wrong file type leads to production delays or muddy results. You want a professional finish, and we deliver it by matching your artwork to the specific requirements of our equipment.
- Screen Printing: Vector files like .AI or .EPS are nearly mandatory. They allow us to scale your logo to any size without losing a single sharp edge.
- Direct to Film (DTF): This method thrives on high-resolution PNGs. The focus here is on transparency and vibrant colour depth for complex designs.
- Sublimation: This is the best choice for all-over photographic prints. High-res JPEGs or TIFFs work best to capture every gradient in a photo or digital painting.
- Embroidery: You aren't printing ink; you're mapping stitches. We take your vector or high-res image and "digitise" it into a format like .DST or .PES so our machines know exactly where every needle drop goes.
The Screen Printing Workflow
Colour separation is the core printing process where we isolate each individual pigment into its own layer for screen production. We use vector paths to ensure these separations are perfectly aligned and crisp. If your design includes gradients or photographic elements, we use halftones. To avoid the dreaded "moiré" pattern, which is a wavy, distorted effect on the fabric, your raster elements must be submitted at 300 DPI. Industry data shows that files submitted at 72 DPI lose over 75% of their clarity when enlarged for a standard chest print.
Modern Digital Printing (DTF & DTG)
Digital methods like DTF provide more flexibility than traditional screen printing because they don't require physical screens for every individual colour. You can print 50 colours as easily as one. However, you must maintain a strict 300 DPI standard for digital transfers to keep the detail sharp. To see how professional-grade sheets handle these requirements, you can explore Per-unit product sales for custom DTF transfers from Printspace. When preparing PNGs, manage your transparency carefully. We often see "ghost pixels" or semi-transparent halos around design edges. These faint pixels will show up as a white crusty outline on the final garment. Use a "hard" edge for your transparency masks to ensure the finish stays clean and retail-ready.
Professional Checklist: Preparing Your Art for RAW Merch
Getting your artwork right the first time saves you money and speeds up your delivery. We've been in this game for over 25 years, so we know exactly what works on a printing press. Follow this checklist to ensure your designs look sharp and professional every single time. YOU WANT IT, WE CREATE IT!
- Set your canvas to 300 DPI from the start. Low resolution is the primary reason for blurry prints. If you start at 72 DPI and try to scale up later, your design will pixelate. High-resolution files are non-negotiable for quality results.
- Convert all text to Outlines or Curves. This locks your typography. If you don't outline your fonts, our system might replace your custom typeface with a default one, ruining your brand aesthetic.
- Switch your colour mode to CMYK. Computer screens display in RGB, but our industrial printers use CMYK inks. Converting early prevents "colour shock" where your bright digital neons turn into dull, muddy tones on fabric.
- Ensure your background is transparent. Don't just leave a white background. If you're printing on a black shirt, a white box around your logo is a rookie mistake that we want to help you avoid.
We know what you want - we deliver on time everytime! Using the best file format for t-shirt printing combined with these technical steps ensures your merchandise stands out from the competition.
To ensure your brand's style is as sharp as your prints, check out Mister Alley for expert editorial content and men's fashion buying guides.
The Canva User's Survival Guide
Canva is a great tool, but you must use the Pro version for professional printing. When you finish your design, select "PDF Print" as your file type. This is the best file format for t-shirt printing when working within Canva because it supports high-quality output. Always tick the "Transparent Background" checkbox during export. Avoid using low-quality "elements" or small stickers from the Canva library, as these often lack the resolution needed for large-scale garment printing.
Sizing Your Art Correctly
Never guess your dimensions. Create your digital file at the exact size you want it printed. If you want a bold chest graphic, set your canvas to 30cm wide. This 1:1 ratio removes all guesswork during production. Keep all vital text and logos at least 15mm away from the edges of your design area. This "safe zone" ensures nothing gets lost in the seams or folds of the garment. Different products require different setups; for example, headwear has much tighter constraints. Check our guide on custom bobble hats to see how sizing changes for specific accessories.
Ready to see your design on high-quality gear? Contact us today for a no-obligation quote and let's get your project moving.
Ready to Print? Let RAW Merch Handle the Rest
You have done the hard work. You have researched the best file format for t-shirt printing and perfected your design. Now you need a partner who understands the technical side of the industry. At RAW Merch, we don't just hit print and hope for the best. Our "No-Nonsense" art check means we review every single file before production begins. If your resolution is too low or your transparency settings are wrong, we catch it. We've spent 25 years ensuring UK bands and businesses look elite, and we bring that experience to every order.
We know that different designs require different approaches. Whether your file is a vector AI or a high-res PNG, we choose the printing method that suits your art perfectly. We specialise in everything from Direct to Film (DTF) for complex, multi-colour gradients to traditional Screen Printing for bold, high-volume runs. Our service is direct and confident. We deliver on time, everytime, so you never have to worry about missing a launch date or a tour kick-off.
Bulk Orders and Fulfillment
Managing large-scale merchandise runs is where we truly shine. We handle massive orders for touring bands and growing brands across the country. If you're hitting the road soon, check out our guide on band merchandise to help plan your tour stock effectively. Since we started, we've supported over 1,200 UK-based creators, maintaining a reputation for quality that stands up to the rigours of the road. Our UK-based facility is built for speed and reliability, ensuring your bulk order arrives exactly as expected without the stress of international shipping delays.
Get a Quote for Your Custom Merch
Ready to see your design on a high-quality tee? Submit your files today for a free, no-obligation quote. If your art isn't quite ready for the press, don't panic. Our team is here to help you fix technical issues to ensure the best file format for t-shirt printing is used for your specific project. We value your time and provide fast turnarounds on all enquiries. We take pride in being the seasoned experts who get the job done right without the fuss.
YOU WANT IT, WE CREATE IT! Contact us today.
Lock In Your Perfect Print Results
Choosing the right digital assets is the difference between a blurry mess and a retail-ready garment. You now know that vector files like EPS or high-resolution 300 DPI PNGs are essential for crisp results. Matching your artwork to specific methods like DTF or screen printing ensures your brand stands out in 2026. Selecting the best file format for t-shirt printing doesn't have to be a headache when you have the right partner on your side.
At RAW Merch, we bring over 25 years of industry experience to every single project. We're a proudly UK-based team offering fast nationwide delivery from our local hub. Every order you place undergoes a rigorous review by our expert art team to catch technical issues before they ever hit the press. We know what you want and we deliver on time every time. Stop guessing about your artwork and let our specialists handle the technical details for you. You want it, we create it.
Get a No-Obligation Quote for Your Custom Merch
Let's get your creative vision onto some high-quality clothing today.
Frequently Asked Questions
Is a 300 DPI PNG good enough for t-shirt printing?
Yes, a 300 DPI PNG is the industry standard for high-quality raster prints like DTF or direct-to-garment. We need this resolution to ensure your design looks sharp and professional on the fabric. If you drop below 300 dots per inch, you'll see pixelation and blurry edges. For the best file format for t-shirt printing, always export your PNG at the exact physical size you want it printed to maintain that 300 DPI clarity.
Can I use a JPEG for my t-shirt design?
You can use a JPEG, but it's rarely the best choice because JPEGs don't support transparency. This means your design will print with a solid white box around it unless we manually remove it. JPEGs also use lossy compression, which can degrade the image quality every time you save it. We recommend using high-resolution PNGs or vector files instead to ensure the highest print quality for your merchandise.
What is the difference between CMYK and RGB for printing?
RGB is for digital screens, while CMYK is the four-colour process used for physical printing. Screens use light to create colours, but our printers use Cyan, Magenta, Yellow, and Black ink. If you design in RGB, your final t-shirt might look duller than it did on your monitor. Always set your colour workspace to CMYK from the start to ensure the 16 million possible RGB colours translate accurately to the physical garment.
How do I convert my logo into a vector file?
You convert a logo to a vector using software like Adobe Illustrator through a process called Image Trace or manual redrawing. Vectors use mathematical paths instead of pixels, so they never lose quality. If you don't have the software, our team has over 25 years of experience handling these conversions. A vector file like an AI or EPS is often the best file format for t-shirt printing because it scales to any size without blurring.
Do I need to leave a transparent background on my design?
Yes, you must use a transparent background if you only want your artwork to show without a surrounding block of colour. If your file has a white background, our DTF and screen printing machines will treat that white as part of the design. Save your files as transparent PNGs or vector PDFs to avoid this issue. This ensures your custom clothing looks exactly how you envisioned it without any unwanted borders.
What happens if my file resolution is too low?
Low-resolution files result in pixelation, where the edges of your design look jagged, blurry, or blocky. If you provide a 72 DPI file, the printer cannot invent the missing detail, leading to a poor-quality finish. We check every file before production to ensure it meets our standards. If your resolution is too low, we'll ask for a better version to ensure we deliver on time everytime with a result you'll love.
Can you print from a screenshot or a photo of a drawing?
We can print from a screenshot or photo, but it usually requires professional recreation to look good. Screenshots are typically 72 DPI, which is far too low for high-quality UK merchandise standards. If you have a drawing, take a high-resolution scan at 600 DPI instead of a photo. Our design team can often redraw these files into vectors to ensure your custom t-shirts look sharp and professional.
Does the file format change if I want embroidery instead of printing?
Yes, embroidery requires a digitised file format like DST or EMB, which tells the machine where to place each stitch. You can't just save a PNG as a DST file; it requires a specialist process called digitisation. We take your high-resolution vector or PNG and convert it into a stitch map. This process accounts for thread count and fabric pull to ensure your logo looks perfect on hoodies or caps.