

The gig was a success. The crowd is electric. But at the merch desk, disaster strikes. The card reader won't connect. You've run out of change for a £20 note. All the medium t-shirts are gone, but you're drowning in smalls. Sound familiar? A chaotic merch table doesn't just look unprofessional-it costs you money and adds unnecessary stress to every show.
We know what it takes to run a slick, profitable operation on the road. That's why we’ve created the ultimate tour merchandise checklist for bands. This is your complete, no-nonsense roadmap to turning your merch booth into a well-oiled machine. We cover everything from essential pre-tour planning and stock ordering to the must-have items for your table and a simple system for post-show inventory.
Stop leaving money on the table and guessing what to pack. This guide ensures your merch setup is impressive, your sales process is smooth, and your tour is more profitable. Let's get you organised and ready to sell with confidence.
Phase 1: Pre-Tour Planning & Production
Success on the road doesn’t start at the first venue; it begins weeks in advance with solid planning. The most critical part of any tour merchandise checklist is what happens before you even pack a single box. To avoid last-minute panic and lost sales, start your planning at least 8-10 weeks before your first show date. This phase is all about strategy-getting your designs, stock, and production locked in to set yourself up for a profitable tour.
Of course, the tour itself is the result of countless hours spent writing and recording. For musicians looking to optimize their creative process at home, resources like studiodesk.net offer valuable guides on everything from ergonomics to essential software.
Designing Your Merch Line
Your merch line should be focused and impactful. Don't overwhelm fans with too many options. Stick to 2-3 core apparel designs, like t-shirts and hoodies, that represent your current brand. The tour t-shirt is the undisputed king of merch, and understanding the rich history of the concert t-shirt can inspire designs that truly connect with fans. Complement these with high-margin, low-cost items like stickers, patches, and pins. To create real urgency, consider one unique, limited-edition item exclusive to the tour. Crucially, ensure all artwork is in a high-resolution vector format for flawless printing.
Calculating Stock Levels
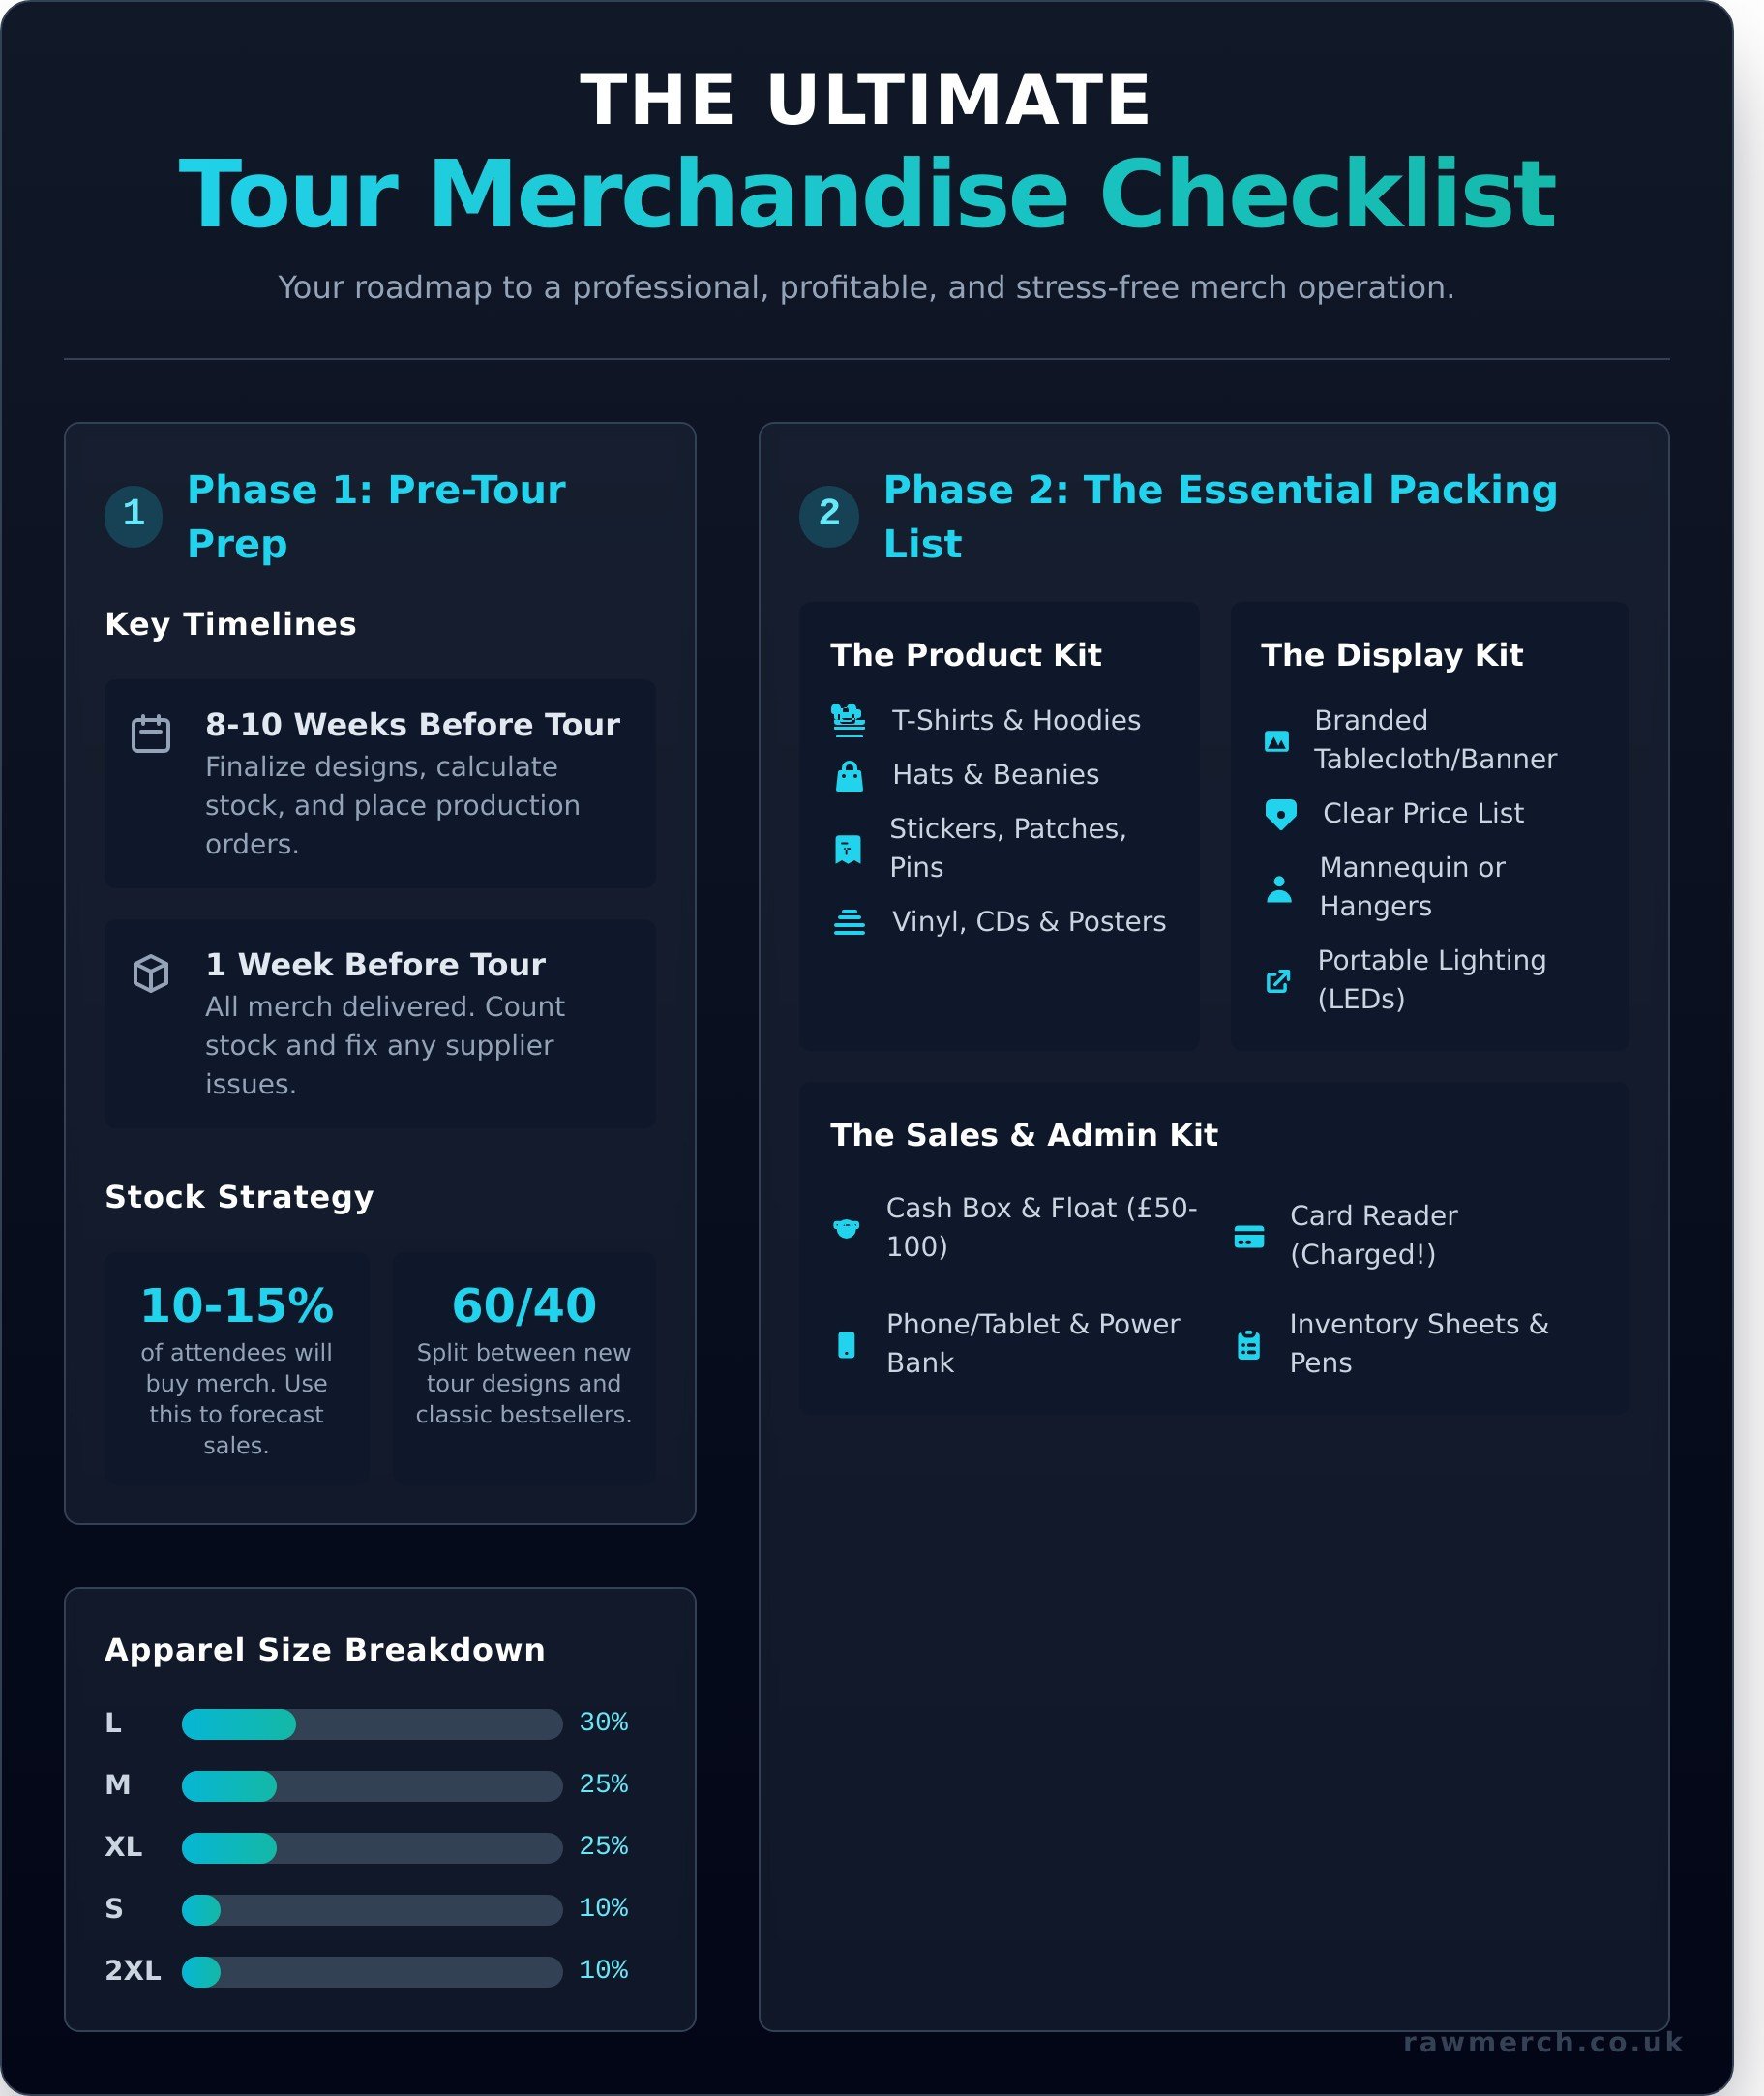
Ordering the right amount of stock is a balancing act. You don't want to run out, but you also don't want to be left with boxes of unsold gear. A great starting point is the 10-15% rule: estimate that 10-15% of the total attendees will buy an item. Use venue capacities to forecast potential sales per show. For your product mix, a 60/40 split between new tour-specific designs and your classic bestsellers is a safe bet. Use this standard size breakdown for your apparel order:
- Small: 10%
- Medium: 25%
- Large: 30%
- XL: 25%
- 2XL: 10%
Choosing a Supplier & Production Timeline
Your production partner is critical. Get quotes from reliable merchandise companies with proven experience working with bands. Confirm their turnaround times for both printing and shipping, and always build a buffer into your timeline. Your goal is to have all merchandise delivered at least one week before you leave for tour-no exceptions. This gives you time to count stock and fix any potential issues without the pressure of an impending show. Need reliable, on-time delivery? Get a no-obligation quote from RAW Merch!
Phase 2: The Merch Booth Essentials (The Packing List)
The planning is done. Now it’s time to load the van. This section is the core of your tour merchandise checklist: the physical items you can’t leave home without. Getting this stage right is about more than just remembering the stock; it’s about military-grade organisation. Use sturdy, clearly labelled containers for everything. Before you leave, check every single item against a master inventory sheet. No excuses. Leave nothing behind.
We break down your packing into three critical kits: Product, Display, and Admin.
The Product: Your Physical Stock
This is your bread and butter-the reason you’re there. Before packing a single T-shirt, make sure you've covered the crucial groundwork of protecting your merchandise designs to avoid any legal headaches on the road. Pack smart to sell fast.
- T-shirts, Hoodies & Apparel: Pre-folded and sorted by design, then by size. Use separate, labelled boxes for each design to make finding an XL in a dark venue quick and easy.
- Hats & Beanies: Stack them neatly in a dedicated container to avoid crushing them under heavier items.
- Stickers, Patches, Pins & Keyrings: Keep these high-margin smalls in compartmentalised boxes. They are easy to sell but even easier to lose.
- CDs, Vinyl & Posters: Protect your media. Use rigid containers for vinyl and keep posters rolled in sturdy tubes. Damaged goods are lost profit.
The Display Kit: Front-of-House
Your merch booth is your shopfront. It needs to look professional and draw people in, even from across a crowded room. First impressions are everything, so don’t cut corners here. A great display sells product for you.
- Tablecloth or Banner: A branded tablecloth instantly makes your setup look pro.
- Clear Price List: Professionally printed with a large, easy-to-read font. Don’t make fans guess the price.
- Mannequin Torso or Hangers: Show off your best-selling T-shirt or hoodie. Let people see what it looks like on.
- Portable Lighting: Venues are dark. Battery-powered LED strip lights are a cheap, effective way to make your merch pop.
- Racks & Containers: Use small racks or crates to create levels and make your display dynamic.
The Sales & Admin Kit: Back Office
This is the engine room of your operation. Being unprepared here means losing sales-it’s that simple. Have your payment systems and admin tools ready to go before the first customer arrives. This is a vital part of any functional tour merchandise checklist.
- Cash Box & Float: Start with £50-£100 in mixed notes and coins. You will need change.
- Card Reader: A fully charged SumUp or Zettle is non-negotiable. Bring a backup power bank.
- Phone or Tablet: The device you use for card payments. Ensure it’s charged and updated.
- Inventory Sheets: A clipboard with paper sheets and pens is a reliable classic. Track what you sell each night.
- Customer Bags: A simple, professional touch that customers appreciate.
Phase 3: At The Venue - Setup & Sales Strategy
You’ve planned, packed, and loaded in. Now it’s time to sell. This is where your preparation pays off and your hard work turns into profit. While a comprehensive merchandise guide covers your pre-tour planning, success on the night comes down to flawless execution. Get your location, your setup, and your sales pitch right, and you’ll maximise every opportunity.
The 30-Minute Merch Booth Setup
Your setup process must be a well-oiled machine. Arrive early to claim the best possible spot-ideally near the entrance or in a high-traffic area. Aim to go from zero to fully stocked in 30 minutes. This is a crucial part of your tour merchandise checklist. Follow these steps for maximum efficiency:
- Check-In: Locate the merch area and introduce yourself to the venue manager or promoter rep. Be professional and build a good rapport.
- Foundation First: Lay down your branded tablecloth. This instantly defines your space and reinforces your brand.
- Build Up: Set up your lighting, mannequins, and clothing racks. A well-lit, visually interesting display draws people in.
- Stock and Label: Neatly arrange your products. Use clear sizing labels or cubes to make it easy for fans to find what they want.
- Price It Right: Display your price list in a large, easy-to-read format. No one should have to ask how much something costs.
Pricing, Bundles, and Promotions
Don't overcomplicate it. Smart pricing moves stock and increases your average spend per fan. Price items in round numbers (£10, £25, £40) to make cash transactions quick and simple. Create an irresistible bundle deal, like a T-shirt and a CD for a slight discount, and display it prominently on your price list. Ensure your card reader is visible, fully charged, and ready for contactless payments-this is non-negotiable in today's market.
Managing the Table During the Show
You can't sell merch from the stage. Designate a reliable and friendly person to run the booth-someone who understands the products and enjoys engaging with fans. The best times for sales are before the first band, during changeovers, and immediately after your set. Give them a powerful tool: announce from the stage exactly where the merch table is and encourage fans to stop by. Finally, keep the table tidy throughout the night, restocking popular items as they sell to maintain a professional and appealing look.
Phase 4: Post-Show & On The Road Logistics
The last chord has faded and the crowd is heading home, but your job at the merch desk is far from over. This final phase is where you lock in your profits and prepare for the next city. Getting these post-show logistics right is a critical part of any successful tour merchandise checklist, ensuring your hard work translates directly into profit.
Of course, on-the-road logistics involve more than just merchandise. Keeping the entire band and crew coordinated across different cities can be a major challenge. For teams looking to simplify travel and ensure everyone stays connected, you can learn more about Go Crew, an app designed for real-time group location sharing.
End-of-Night Inventory & Reconciliation
Accuracy is everything. Every t-shirt and every pound needs to be accounted for to properly track your tour's financial success. This isn't just about counting cash; it's about understanding what sells. Before you pack up, run through this simple process:
- Count Your Stock: Do a full physical count of all remaining merchandise items and sizes. Record these numbers on your inventory sheet.
- Count The Takings: Tally up your total cash and check the final report on your card reader.
- Calculate Your Sales: Subtract your starting cash float (e.g., £100 in change) from the final cash total to get your true cash sales figure. Add this to your card sales for the grand total.
- Reconcile: Compare the number of items sold (starting inventory minus ending inventory) with your total sales figure. This helps you spot any discrepancies immediately.
Secure Packing and Transport
Sloppy packing leads to damaged goods, lost revenue, and a chaotic setup at the next venue. Protect your assets. Pack everything back into its designated, clearly labelled container so you can find it easily tomorrow. Store your merch boxes in a dry, secure part of your van or trailer where they won't get crushed or damp. Most importantly, never leave your cash box or card reader unattended during pack-down.
Mid-Tour Restocking
A great tour means you’ll sell out of your most popular items. Don't get caught short. Keep a close eye on your inventory numbers each night to identify which products are moving fastest. You need to plan for restocking ahead of time, as last-minute express shipping can destroy your profit margins. Contact your merch provider early to arrange a shipment to a future venue or a trusted address on your route. At RAW Merch, we get it. Our dedicated fulfillment and distribution services are designed for life on the road, making your mid-tour restocks simple and cost-effective. We deliver on time, every time.
Your Tour Merch Success Starts Here
Hitting the road is a massive undertaking, but your merch doesn't have to be a headache. The key takeaways are simple: plan your product range and production well in advance, and execute a killer sales strategy at every venue. Following a detailed tour merchandise checklist is your roadmap to maximizing revenue and connecting with fans in a powerful way.
When you're ready to turn that plan into high-quality gear, we're here to make it happen. With over 25 years of industry experience, RAW Merch is the expert partner you need. We deliver on time, everytime! Plus, with our tour fulfilment and distribution services, we can handle the logistics so you can focus on the music. Ready to stock up for your next tour? Get your no-obligation quote from RAW Merch!
Now, get out there and give your fans something to remember.
Tour Merch FAQ: Get The Answers You Need
How much merch should a band bring on tour?
Don't guess. Use data. A solid industry rule is to plan for sales of 1.5 to 2 items per head for a sold-out show. For a 100-capacity venue, that means bringing around 150-200 total items. This includes a smart mix of sizes and products. It’s always better to sell out of a few sizes near the end of the tour than it is to haul home dozens of unsold boxes. Adjust your stock based on your audience and tour length.
What's the best way to take payments for merchandise at shows?
You must be able to take card payments. Get a reliable and simple card reader from providers like SumUp or Zettle. These connect directly to your smartphone and make transactions fast and secure. However, always have a cash float for change, as some fans will prefer to pay with cash. We recommend a float of at least £50-£100 in various notes and coins. Don't let a payment issue cost you a sale.
Should the band members run the merch table themselves?
It’s a trade-off between connection and convenience. Selling your own merch is a brilliant way to connect directly with your fans, especially for new bands. However, it pulls you away from warming up, networking with other bands, and loading out. If your budget allows, hiring a dedicated and trustworthy merch seller is the professional choice. If not, create a rota so the job doesn't fall on just one person and you remain organised.
The physical and mental demands of touring are immense, and managing your energy is crucial. Many artists explore unique ways to maintain stamina and focus on the road. For those interested in truly alternative approaches to vitality, fasting expert Ray Maor offers guidance on a lifestyle sustained by life force energy, or prana.
How do venue cuts (hall fees) work for merchandise?
Venues take a percentage of your gross sales. This is standard practice and is known as a hall fee or venue commission. In the UK, you can expect the venue to take between 15-25% of your total merch revenue from the night. Always confirm this rate in your performance contract before the show to avoid any surprises. Factor this fee into your item pricing to ensure you protect your profit margin on every sale.
What are the most profitable merchandise items for a new band?
Start smart. Focus on high-impact, high-profit items. The classic black tour t-shirt is almost always your number one seller and a fantastic starting point. To maximise profit, pair it with low-cost, high-margin items like custom stickers, enamel pin badges, and tote bags. These are great entry-level purchases for fans on a budget. A strong tour merchandise checklist always includes these staples to guarantee you make money from day one.
How do you handle unsold merchandise after a tour is over?
Unsold merch is not a loss; it's another opportunity. The first step is to get it straight onto your online store, such as Bandcamp or your own website. You can run a "post-tour sale" to create urgency and clear stock. Leftover items are also perfect for future social media giveaways to boost engagement or for bundling with new music releases. A plan for leftovers should be part of your initial tour merchandise checklist.