
You’ve poured your creativity into a killer t-shirt design. The last thing you need is for it to print as a blurry, pixelated disaster. That fear of rejected files, wasted money, and confusing technical jargon is real, but it stops here. Getting your vision from screen to fabric perfectly is our business, and it all starts with understanding the essential artwork requirements for t-shirt printing.
Forget the confusion. This is your no-nonsense, get-it-done guide. We’re cutting through the noise to give you the ultimate checklist for print-ready files. We’ll demystify everything from vector vs. raster and DPI to the correct colour modes, ensuring your design looks exactly how you imagined it. Submit your artwork with total confidence and get a flawless result on time, every time. Let's get it right.
Key Takeaways
- Choose the right artwork type-Vector or Raster-from the start. This single decision is crucial for a crisp, high-quality print.
- Nail the technical details every time. Your file format, resolution, and dimensions are the foundation for a flawless print result.
- Stop guessing with colours. Learn why your screen doesn't match the final print and how to set up your artwork for accurate, vibrant results.
- The best file setup depends on the printing method. Master the specific artwork requirements for t-shirt printing whether you're using screen printing, DTF, or another technique.
The Foundation: Vector vs. Raster Artwork
Getting your artwork right is the single most important step for a flawless print. Understanding the difference between vector and raster files is the foundation of all artwork requirements for t-shirt printing. This choice directly impacts your design's sharpness, scalability, and how easily we can prepare it for production.
Think of it this way: a raster image is a finished photograph, while a vector file is a recipe. One is a fixed snapshot, while the other provides instructions that can be perfectly recreated at any size. Getting this right from the start saves time and guarantees a professional finish.
What is Raster Artwork? (The Pixel-Based Image)
Raster artwork is built from a grid of tiny squares called pixels, like a digital mosaic. When you enlarge the image, you stretch those pixels, causing the design to look blurry or "pixelated." While perfect for detailed photographs where subtle colour blends are key, their fixed resolution is a major limitation for apparel printing.
- Made of: A finite grid of pixels.
- Common File Types: JPG, PNG, GIF, TIFF.
- Key Weakness: Loses quality and sharpness when scaled up.
- Best For: Complex photographs and full-colour photorealistic images.
What is Vector Artwork? (The Scalable Design)
Vector artwork is the undisputed champion for most custom merchandise. Instead of pixels, it uses mathematical equations, points, and paths to create shapes. This means you can scale a vector design from the size of a lapel pin to the side of a bus with absolutely zero loss in quality. It will always be perfectly sharp and clean.
- Made of: Mathematical paths, points, and curves.
- Common File Types: AI, EPS, SVG, some PDFs.
- Key Strength: Infinitely scalable with no quality loss.
- Best For: Logos, text, illustrations, and solid-colour graphics.
Which One Do You Need for T-Shirt Printing?
For the best results, vector is the professional standard. Vector files guarantee crisp, clean lines and make colour separation for methods like the traditional screen printing process straightforward and precise. This gives us maximum control to produce a vibrant, sharp print every time.
While a high-resolution raster file (at least 300 DPI at the final print size) can work for some digital methods like DTG (Direct-to-Garment) printing, it lacks the flexibility of a vector. When in doubt, providing a vector file is the surest way to get the quality you want. It is the ideal format to meet professional artwork requirements for t-shirt printing.
Core File Specs: Your Technical Checklist for Print-Ready Art
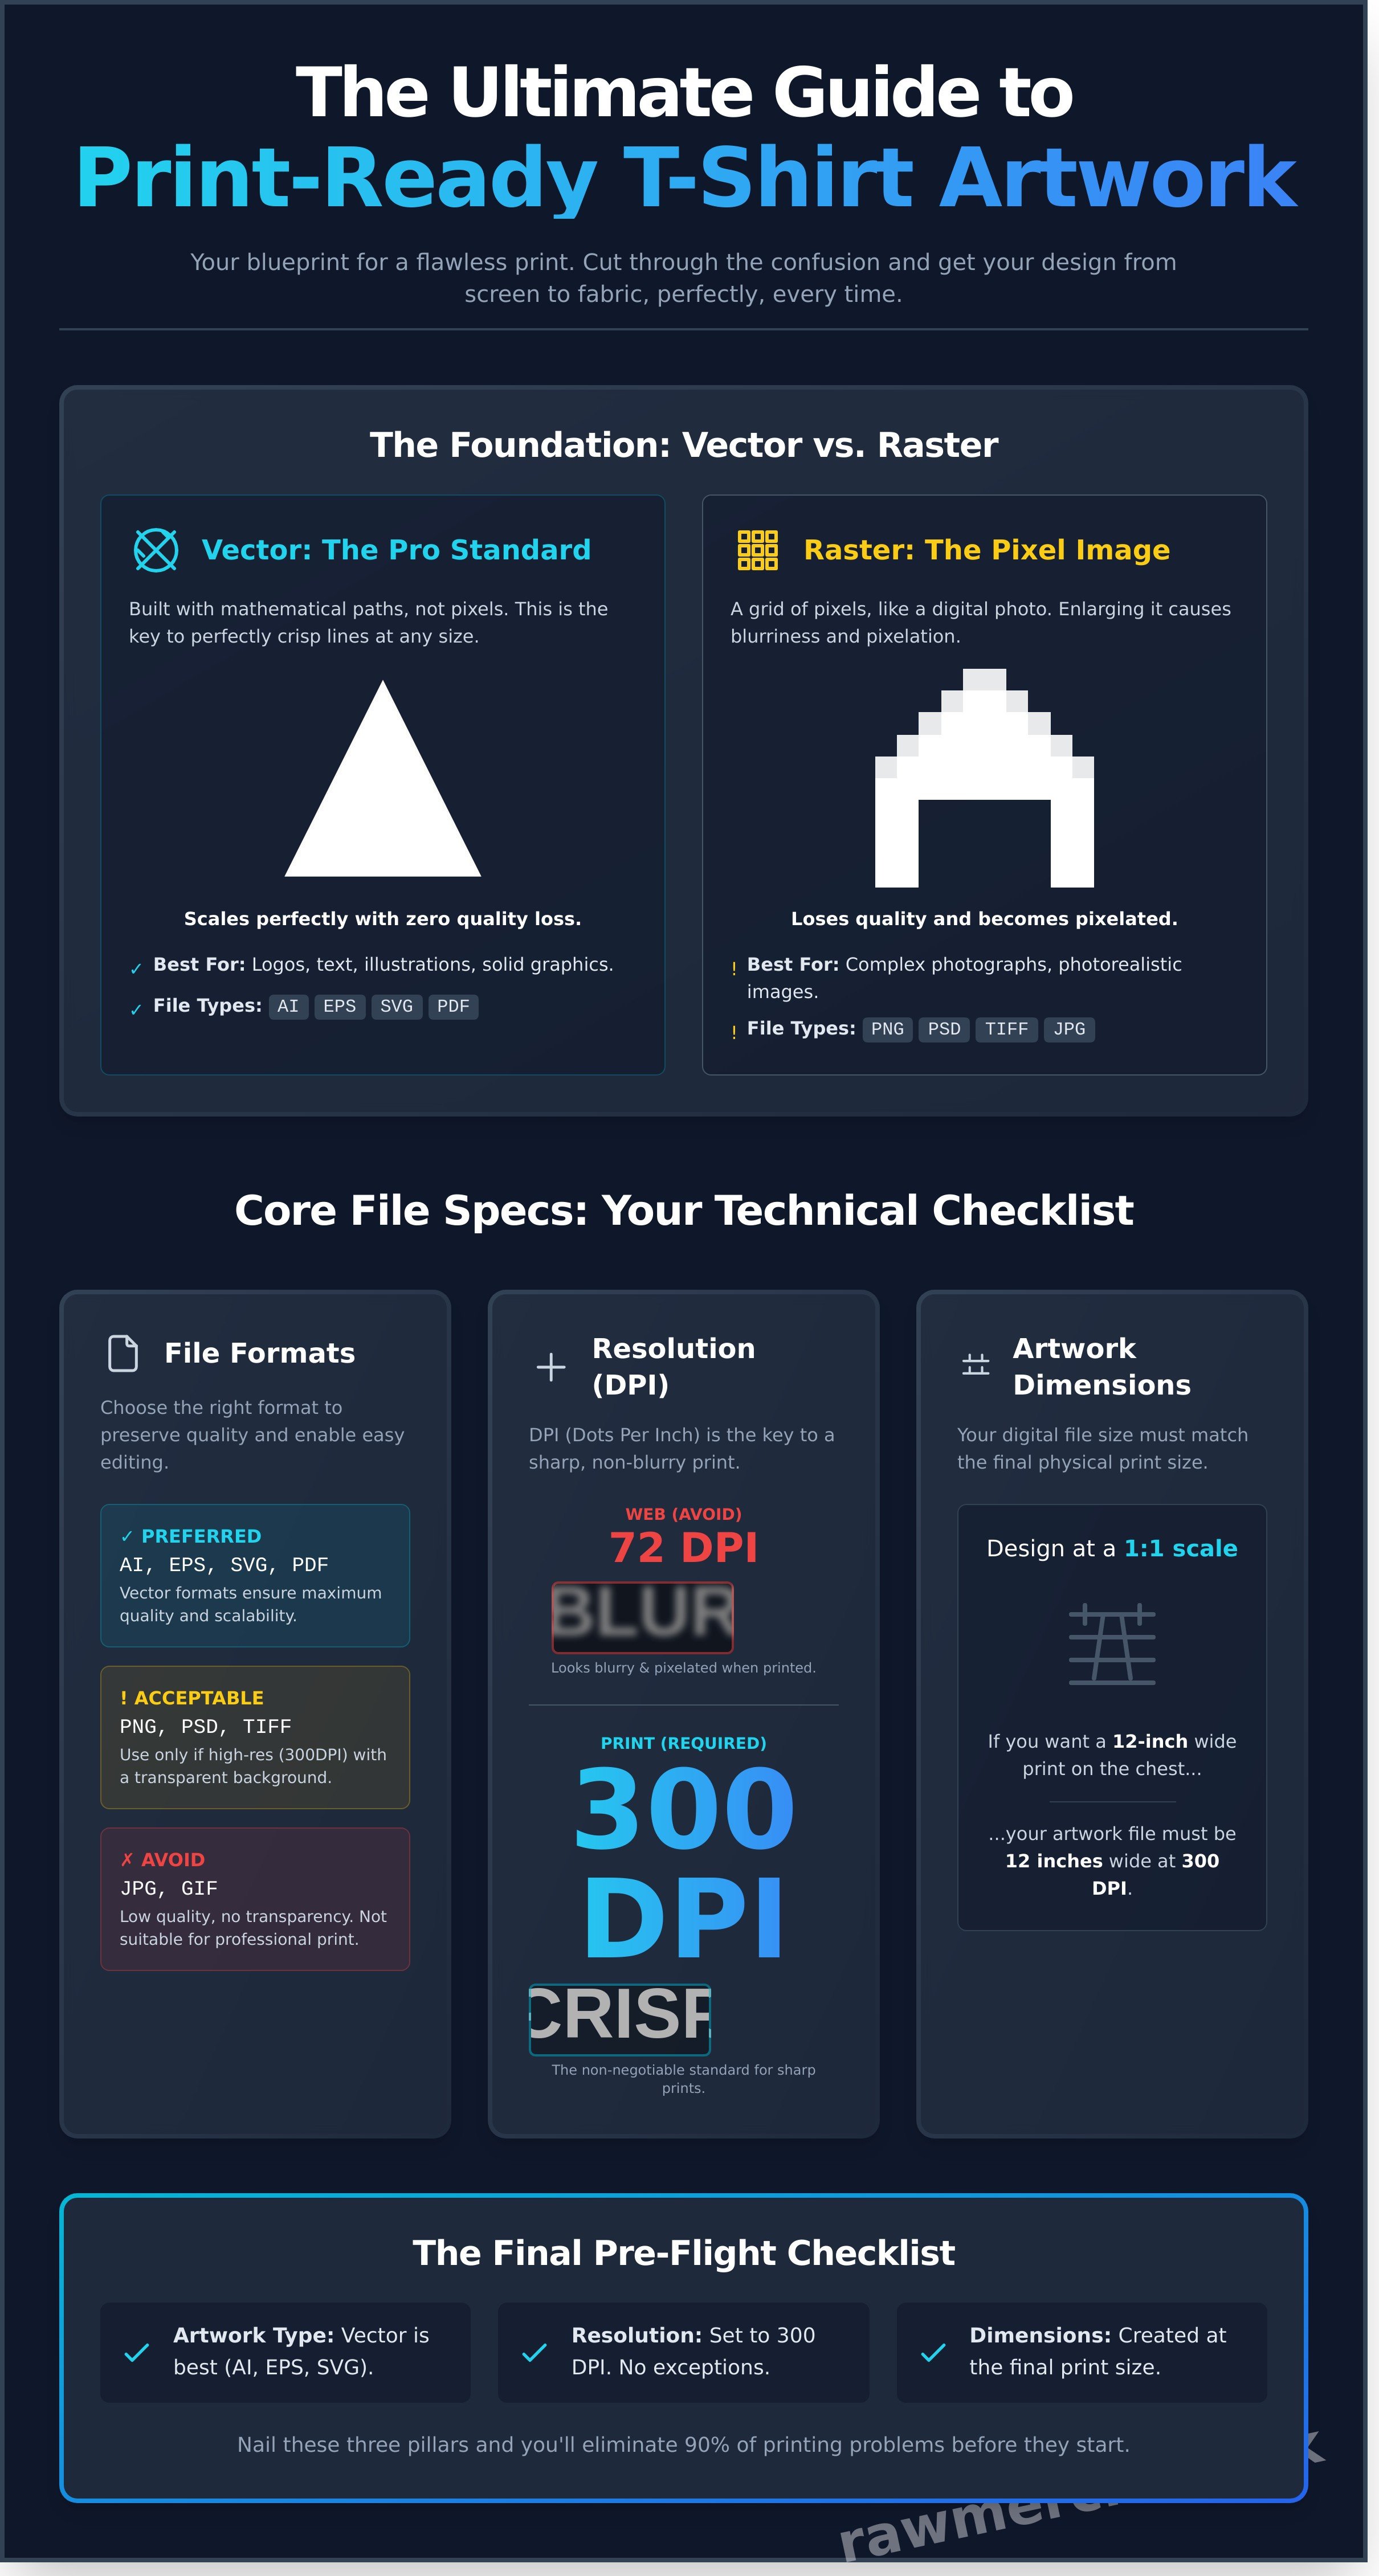
Let’s get straight to it. Getting your file specs right is the single most important step in creating flawless custom merchandise. This isn't about being overly technical; it's about following a simple checklist. Nail these three pillars, and you’ll eliminate 90% of common printing problems before they even start. This is how you guarantee your vision comes to life exactly as you imagined.
File Formats: Which to Use and Why
Your file format determines how much data we can work with. Choose the right one to preserve every detail of your design and ensure the best possible print. Here's what you need to know:
- Preferred (Vector): AI, EPS, PDF. These are the gold standard. Vector files are built with mathematical lines, not pixels, meaning they can be scaled to any size without losing quality. Perfect for screen printing and ensuring ultra-sharp lines.
- Acceptable (Raster): PNG, PSD, TIFF. If your design is pixel-based (like a photograph), these are your best options. They support high resolutions and, crucially, transparent backgrounds. A high-quality PNG is often perfect for DTG printing.
- Avoid: JPG, GIF. These formats use compression that degrades quality and they don't support transparency. They are built for the web, not for professional printing. Submitting these will result in a fuzzy print, often with an unwanted white box around it.
Resolution & DPI: The Key to a Crisp, Sharp Print
Resolution determines the sharpness of your print. DPI stands for 'Dots Per Inch'-it's the density of ink dots that will make up your image on the fabric. The magic number for printing is 300 DPI. No exceptions.
Artwork Dimensions & Sizing
Your design should be created at the exact size you want it printed. If you want a 12-inch wide design across the chest, your digital canvas must be set to 12 inches wide at 300 DPI. This ensures we are working with a 1:1 scale of your final product.
Crucially, you cannot simply scale up a small, low-resolution file. Stretching a 3-inch graphic to 12 inches just makes the pixels bigger and the image blurrier. You can't create detail that wasn't there to begin with. For those using Adobe Illustrator, this technical guide to preparing artwork from Smashing Magazine is an excellent resource for professional file setup. Remember to consider standard print areas like the full front, left chest, or sleeve when finalising your dimensions.
Mastering Colour & Detail for Accurate Prints
Ever designed a t-shirt with a stunning, vibrant graphic on your screen, only to receive the final print and find the colours look dull and different? This is a common problem, but it’s entirely avoidable. Understanding how colour and detail translate from a digital file to a physical garment is what separates an amateur design from a professional, print-ready one. Nailing these technical points is a crucial part of the artwork requirements for t-shirt printing.
This principle of faithful reproduction is universal, whether you're printing on fabric or creating fine art for display. For instance, getting the colors just right for prints by artists like those featured at the First4Frames Gallery requires the same attention to detail.
Colour Modes: CMYK vs. RGB
Your screen and our printers speak two different languages. Screens use the RGB (Red, Green, Blue) colour model, which combines light to create colours. In contrast, printers use the CMYK (Cyan, Magenta, Yellow, Black) model, which uses ink to absorb light. You must set up your artwork in CMYK. Why? Because some brilliant colours you see in RGB, like electric blues and neon greens, simply don't exist in the CMYK spectrum and cannot be replicated with ink.
Pantone (PMS) Colours for Perfect Brand Matching
When an exact colour match is non-negotiable, we use the Pantone Matching System (PMS). Think of PMS as a universal recipe book for colour. Each shade has a unique code, guaranteeing that your brand’s specific red or blue looks identical on every single print run. This is essential for screen printing and maintaining brand consistency. For guaranteed accuracy, specify the exact PMS colour codes in your vector artwork.
Maintaining this level of brand consistency across both digital and physical media is a hallmark of professional design. Creative agencies that handle everything from web design to print, such as Pro-Creative, are experts at creating a unified brand identity that works everywhere.
Fine Lines & Transparency
The devil is in the details. Lines and small text that are too thin can disappear or break up during the printing process. As a rule, ensure all linework is at least 1pt thick to hold its integrity. For transparency, especially with DTG printing, your design must have a genuinely transparent background-not a white box coloured to match the shirt. Properly knocking out the background ensures your design will look sharp on any colour garment. Adobe provides excellent guidance on getting your files print-ready in Illustrator, covering these vital final steps.
Getting these advanced artwork requirements for t-shirt printing right takes experience. If you're not a designer and want to skip the technical headaches, we’ve got you covered. Let us handle the printing perfectly. We know exactly how to prep your files for a flawless finish.
Artwork Prep for Different Printing Methods
Your finished t-shirt will only ever be as good as the artwork you provide. To get a flawless result, you need to match your file type to the printing method. Understanding the correct artwork requirements for t-shirt printing from the start saves you time, money, and guarantees a professional finish. This knowledge empowers you to have a clear, intelligent conversation with your printer and ensures your vision is executed perfectly.
We've broken down the key requirements for the industry's most popular customisation techniques. Get this right, and you're already halfway to creating incredible merch.
Requirements for Screen Printing
- File Type: Vector files (AI, EPS, SVG) are non-negotiable. They allow for clean separation of each colour layer.
- Colour Palette: Less is more. Every colour needs a unique screen, which adds to the setup cost. Limiting your design to 1-4 colours keeps it cost-effective.
- What to Avoid: Photographic images and complex gradients are difficult to reproduce and will drive up your costs significantly.
Requirements for DTG (Direct-to-Garment) Printing
Think of DTG as a high-spec inkjet printer that applies ink directly onto fabric. This method is unbeatable for full-colour photos, intricate illustrations, and designs with unlimited shades and gradients.
- File Type: A high-resolution raster file is essential. A PNG file is the industry standard.
- Resolution: Your file must be at least 300 DPI (Dots Per Inch) at the intended print size to avoid a blurry, pixelated result.
- Background: A transparent background is absolutely critical. Without it, the printer will create a solid block of colour around your design.
Requirements for Embroidery
Embroidery adds a premium, textured finish by stitching your design into the garment. It’s not printing, so the artwork needs to be translated into a format a machine can read-a process called digitizing.
- Digitizing: Your artwork must be converted into a stitch file. We handle this, but a clean source file makes the process seamless.
- File Type: A clean vector file (AI, EPS) is the best starting point for an accurate digitization.
- Design Rules: Bold and simple works best. Avoid tiny text (under 6mm high), very fine details, and gradients, as they get lost in the thread work.
Now you can speak the language of print. When you're ready to bring your vision to life, we're here to make it happen. Got your files ready or need some expert advice? Get a no-obligation quote from us today.
The Final Pre-Flight Checklist: Avoid These Common Mistakes
You're almost there. Before you hit 'send,' run through this final checklist. These simple steps are what separate amateur submissions from professional, print-ready files. Catching these small errors saves you time, avoids costly reprints, and guarantees your vision is printed exactly as you designed it. This is the final check to ensure you've met all the crucial artwork requirements for t-shirt printing.
Convert All Text to Outlines/Curves
Any live text in your design file relies on a font file installed on your computer. If we don't have that exact font, our system will substitute it, and your design will break. To prevent this, you must convert all text to outlines (in Adobe Illustrator) or curves (in CorelDRAW). This simple command turns your text into permanent, non-editable vector shapes, locking in your typography perfectly.
Embed Your Images
If you've placed a raster image (like a JPEG or PNG) into your main vector file (like an AI or EPS), it might only be linked. This means your file just contains a reference to the image's location on your computer. You must embed the image instead. Embedding packages the full image data directly into your artwork file, so we see exactly what you see. Without it, we just get an error for a missing link.
Clean Up Your File
A clean file is an efficient file. Printers work with the data you provide, including hidden elements you can't see. A professional file is tidy, organised, and contains only the necessary artwork. Before saving your final version, make sure you:
- Delete all hidden layers, guides, and stray points outside your artboard.
- Outline all strokes to convert them into solid shapes. This ensures line widths stay consistent when scaled.
- Run a final spell check on all text. A small typo can ruin a great t-shirt design.
There you have it. A simple, powerful checklist to guarantee your artwork flies through the printing process without a hitch. By following these steps, you’re submitting your files like a pro and setting your project up for a flawless result.
Ready to bring your vision to life? We're ready to print it. Send your perfected artwork over to the team at RAW Merch today!
From Artwork to Awesome: Your Final Step
Navigating the world of print-ready files doesn't have to be complicated. By now, you understand the critical difference between vector and raster, the importance of correct resolution and colour modes, and how to prep your files for specific printing methods. Mastering these core artwork requirements for t-shirt printing is your guarantee that the design you love on screen will look just as incredible on fabric.
The right preparation is half the battle, but the right partner makes all the difference. At RAW Merch, we bring over 25 years of hands-on printing experience to every single project. We are the go-to experts for bands, brands, and businesses who demand quality and reliability. We know what works, and most importantly, we deliver on time, every time.
Your vision is ready. Let's make it a reality.
Artwork ready? Get your no-obligation quote from the experts!
Frequently Asked Questions
Can I use a design I made in Canva for t-shirt printing?
Yes, you can use Canva, but you must export your file correctly for a professional result. For a flawless print, save your design as a high-resolution 'PDF Print' file or as a PNG with a transparent background. Using Canva Pro gives you more control over the final size and resolution. Always ensure your artwork is set to at least 300 DPI at the intended print size to meet our quality standards.
What should I do if I only have a low-resolution JPG of my logo?
A low-resolution JPG is not suitable for quality printing and will look blurry and pixelated on a shirt. The best solution is to source the original vector file (AI, EPS, or SVG) from your designer. If the original is lost, the logo must be professionally redrawn or 'vectorised'. We can provide this service for a small fee to guarantee your final print is sharp, clean, and professional.
How can I check the DPI (resolution) of my image?
Checking your image resolution is simple. On a Windows PC, right-click the file, select 'Properties', and go to the 'Details' tab to see the DPI. On a Mac, open the image in the Preview app, go to 'Tools' in the top menu, and select 'Show Inspector'. The 'Image DPI' will be listed in the window. Remember, the minimum artwork requirements for t-shirt printing demand 300 DPI at full print size.
Do I need to add a 'bleed' area to my t-shirt artwork?
No, you do not need to add a bleed area to your t-shirt artwork. Bleed is a requirement for paper printing, where designs are printed over the edge and then trimmed down. With garment printing methods like DTG or screen printing, the design is applied directly onto the product's surface. Just supply your file with a clean edge or a transparent background, and we will handle the precise placement.
Why do the colours on my printed shirt look different from my computer screen?
Your screen and our printers use different colour systems. Screens use an RGB (Red, Green, Blue) light-based model, which can produce very bright, vivid colours. Our printing processes use a CMYK (Cyan, Magenta, Yellow, Black) ink model. This means some super-bright screen colours cannot be perfectly replicated with ink. For precise colour matching, especially for corporate branding, provide us with Pantone (PMS) colour codes.
What's the easiest way to send large artwork files to a printer?
Email services often have strict file size limits that can block or compress your artwork, reducing its quality. The best and most reliable method is to use a free file transfer service like WeTransfer or Dropbox. These platforms allow you to upload your full-quality master file and simply send us a secure download link. This guarantees we receive your artwork exactly as you intended, with no quality loss.